• Skip to primary navigation
  • Skip to main content
  • Home
  • About Me
  • Recipes
    • Cake
    • Biscuits
    • Bread
    • Pastry
    • Tray Bakes
    • Condiments
    • Bake with the kids
    • Anti Inflammatory Baking
  • Conversion Charts. Cups – Grams – Ounces
  • Blog

Cluck, Muck & Cook

Baking & Foodie Blog From Sunny Brentwood Essex

Bake with the kids

8 April 19, 2019 Bake with the kids

Chilli cornbread muffins

For me the summer means BBQs and outdoor eating. Our allotment will often have BBQs through the summer months when we can all get together for a chat and a cold drink.
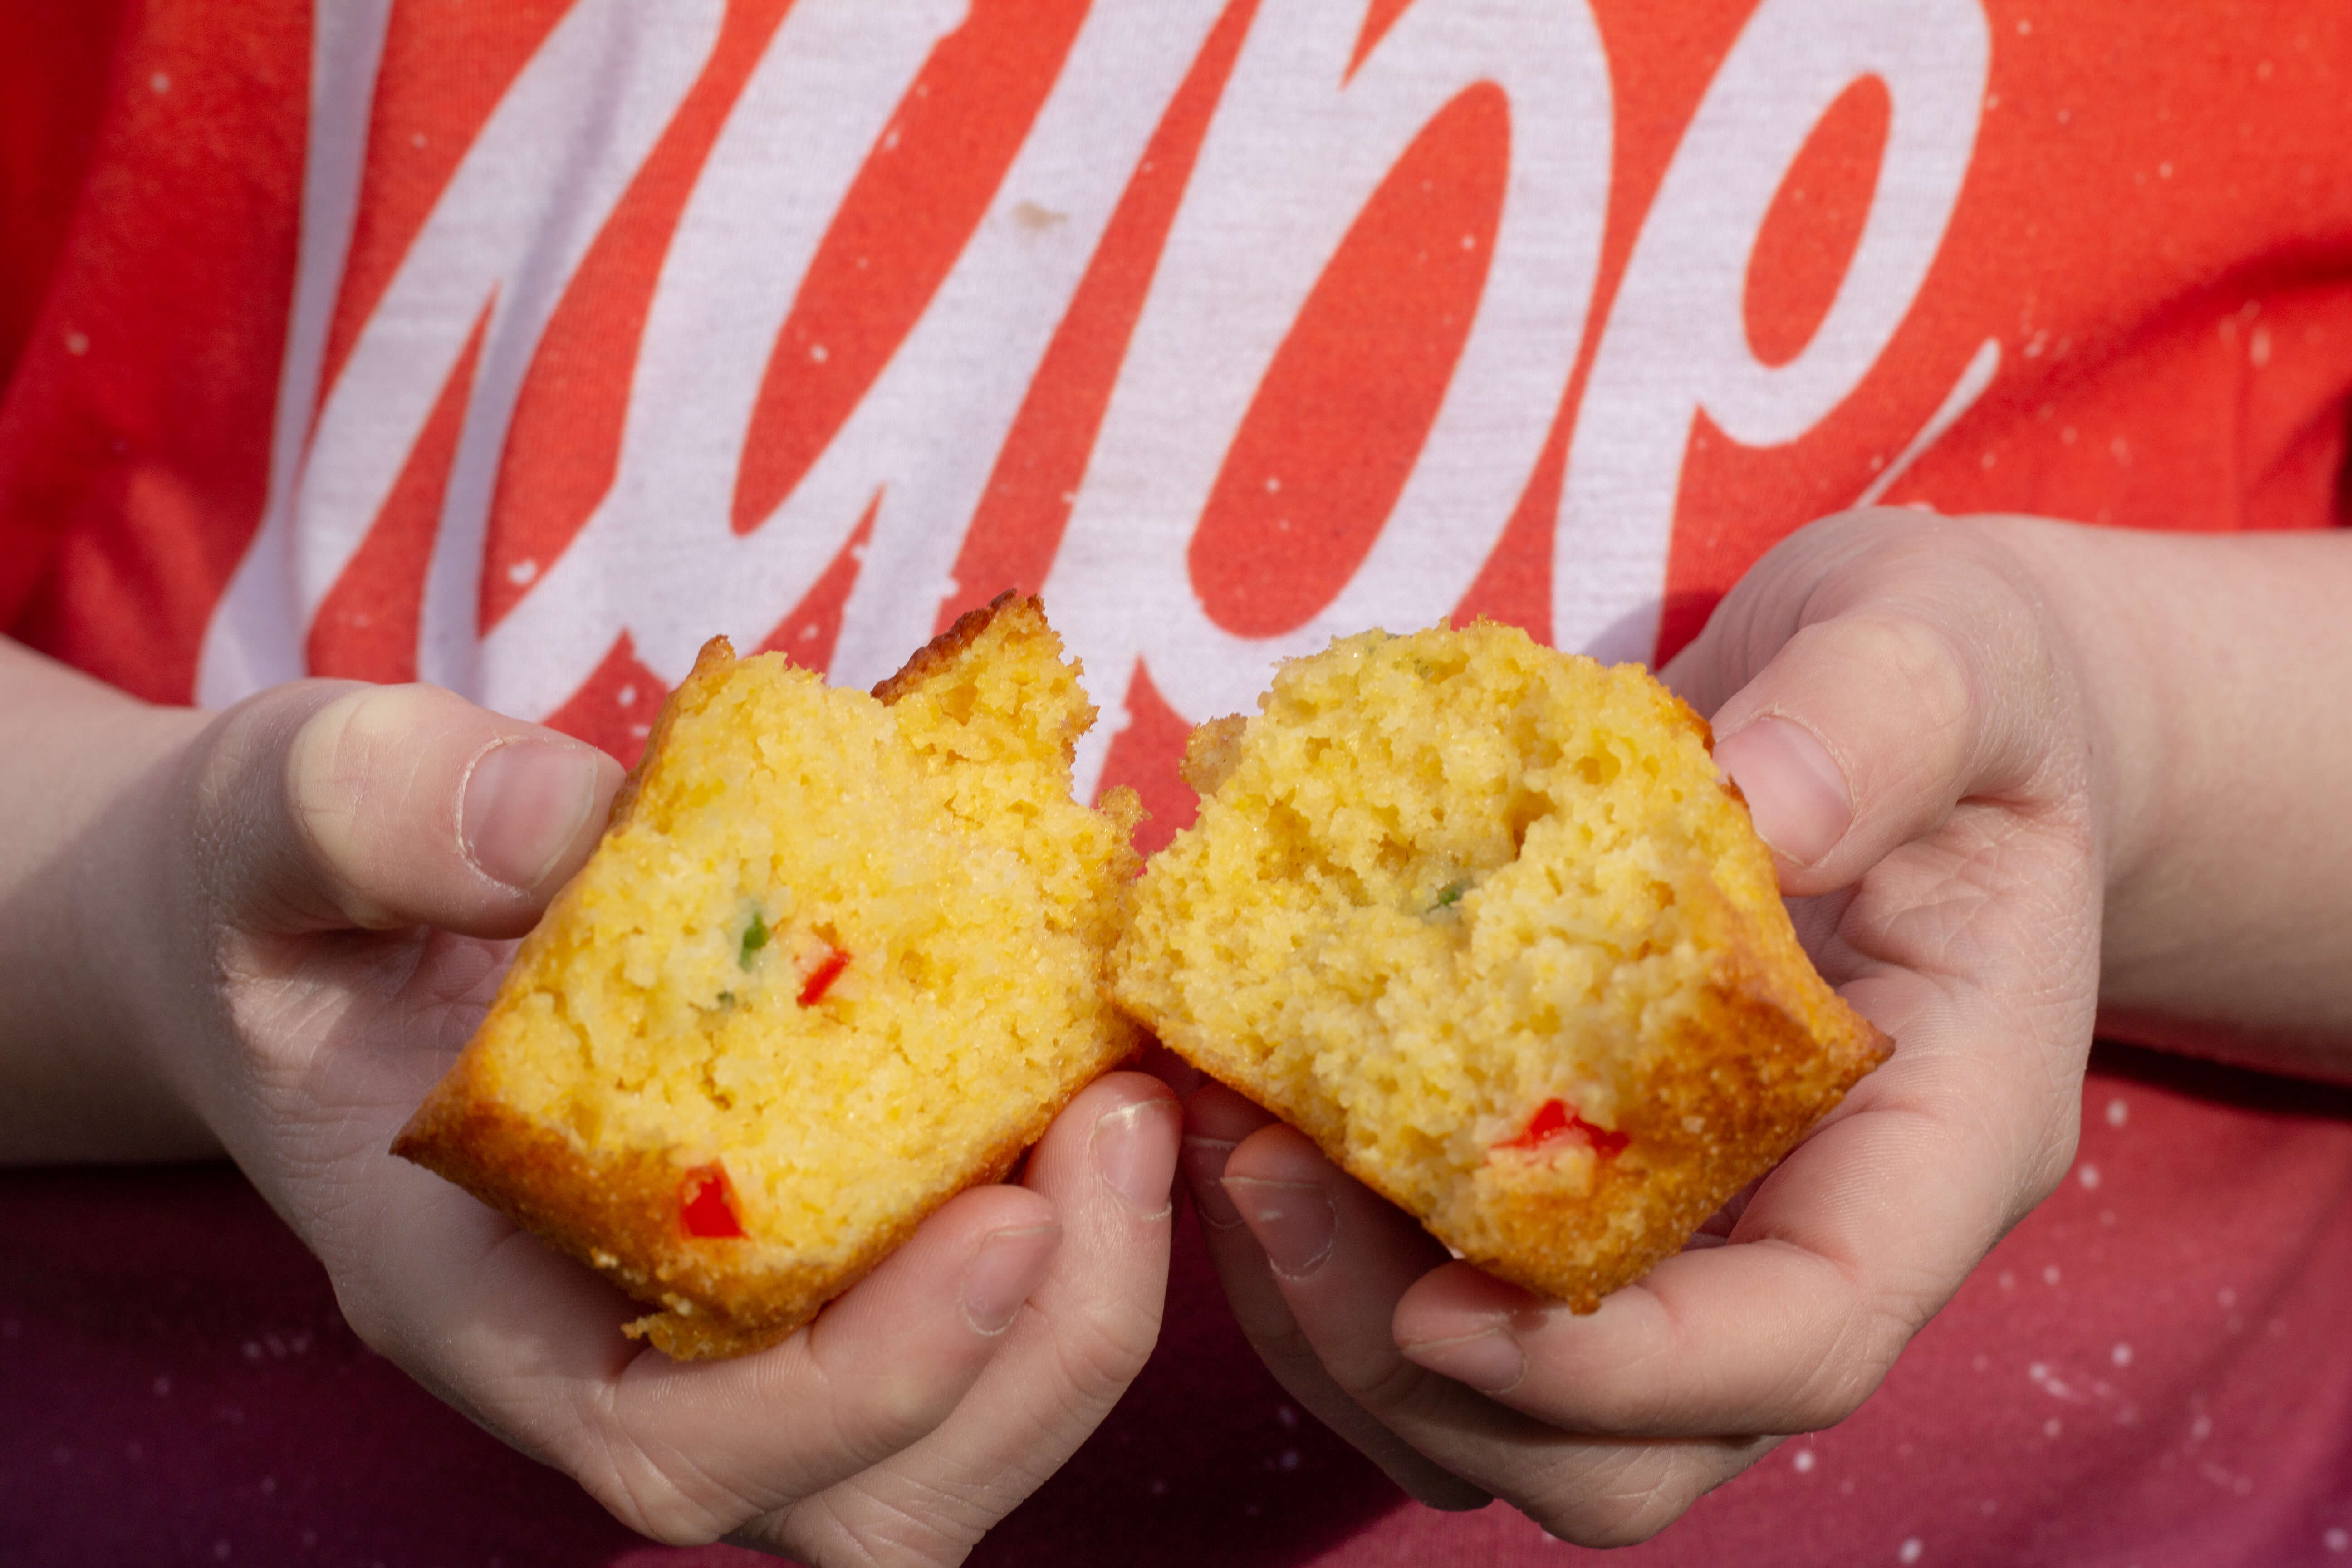
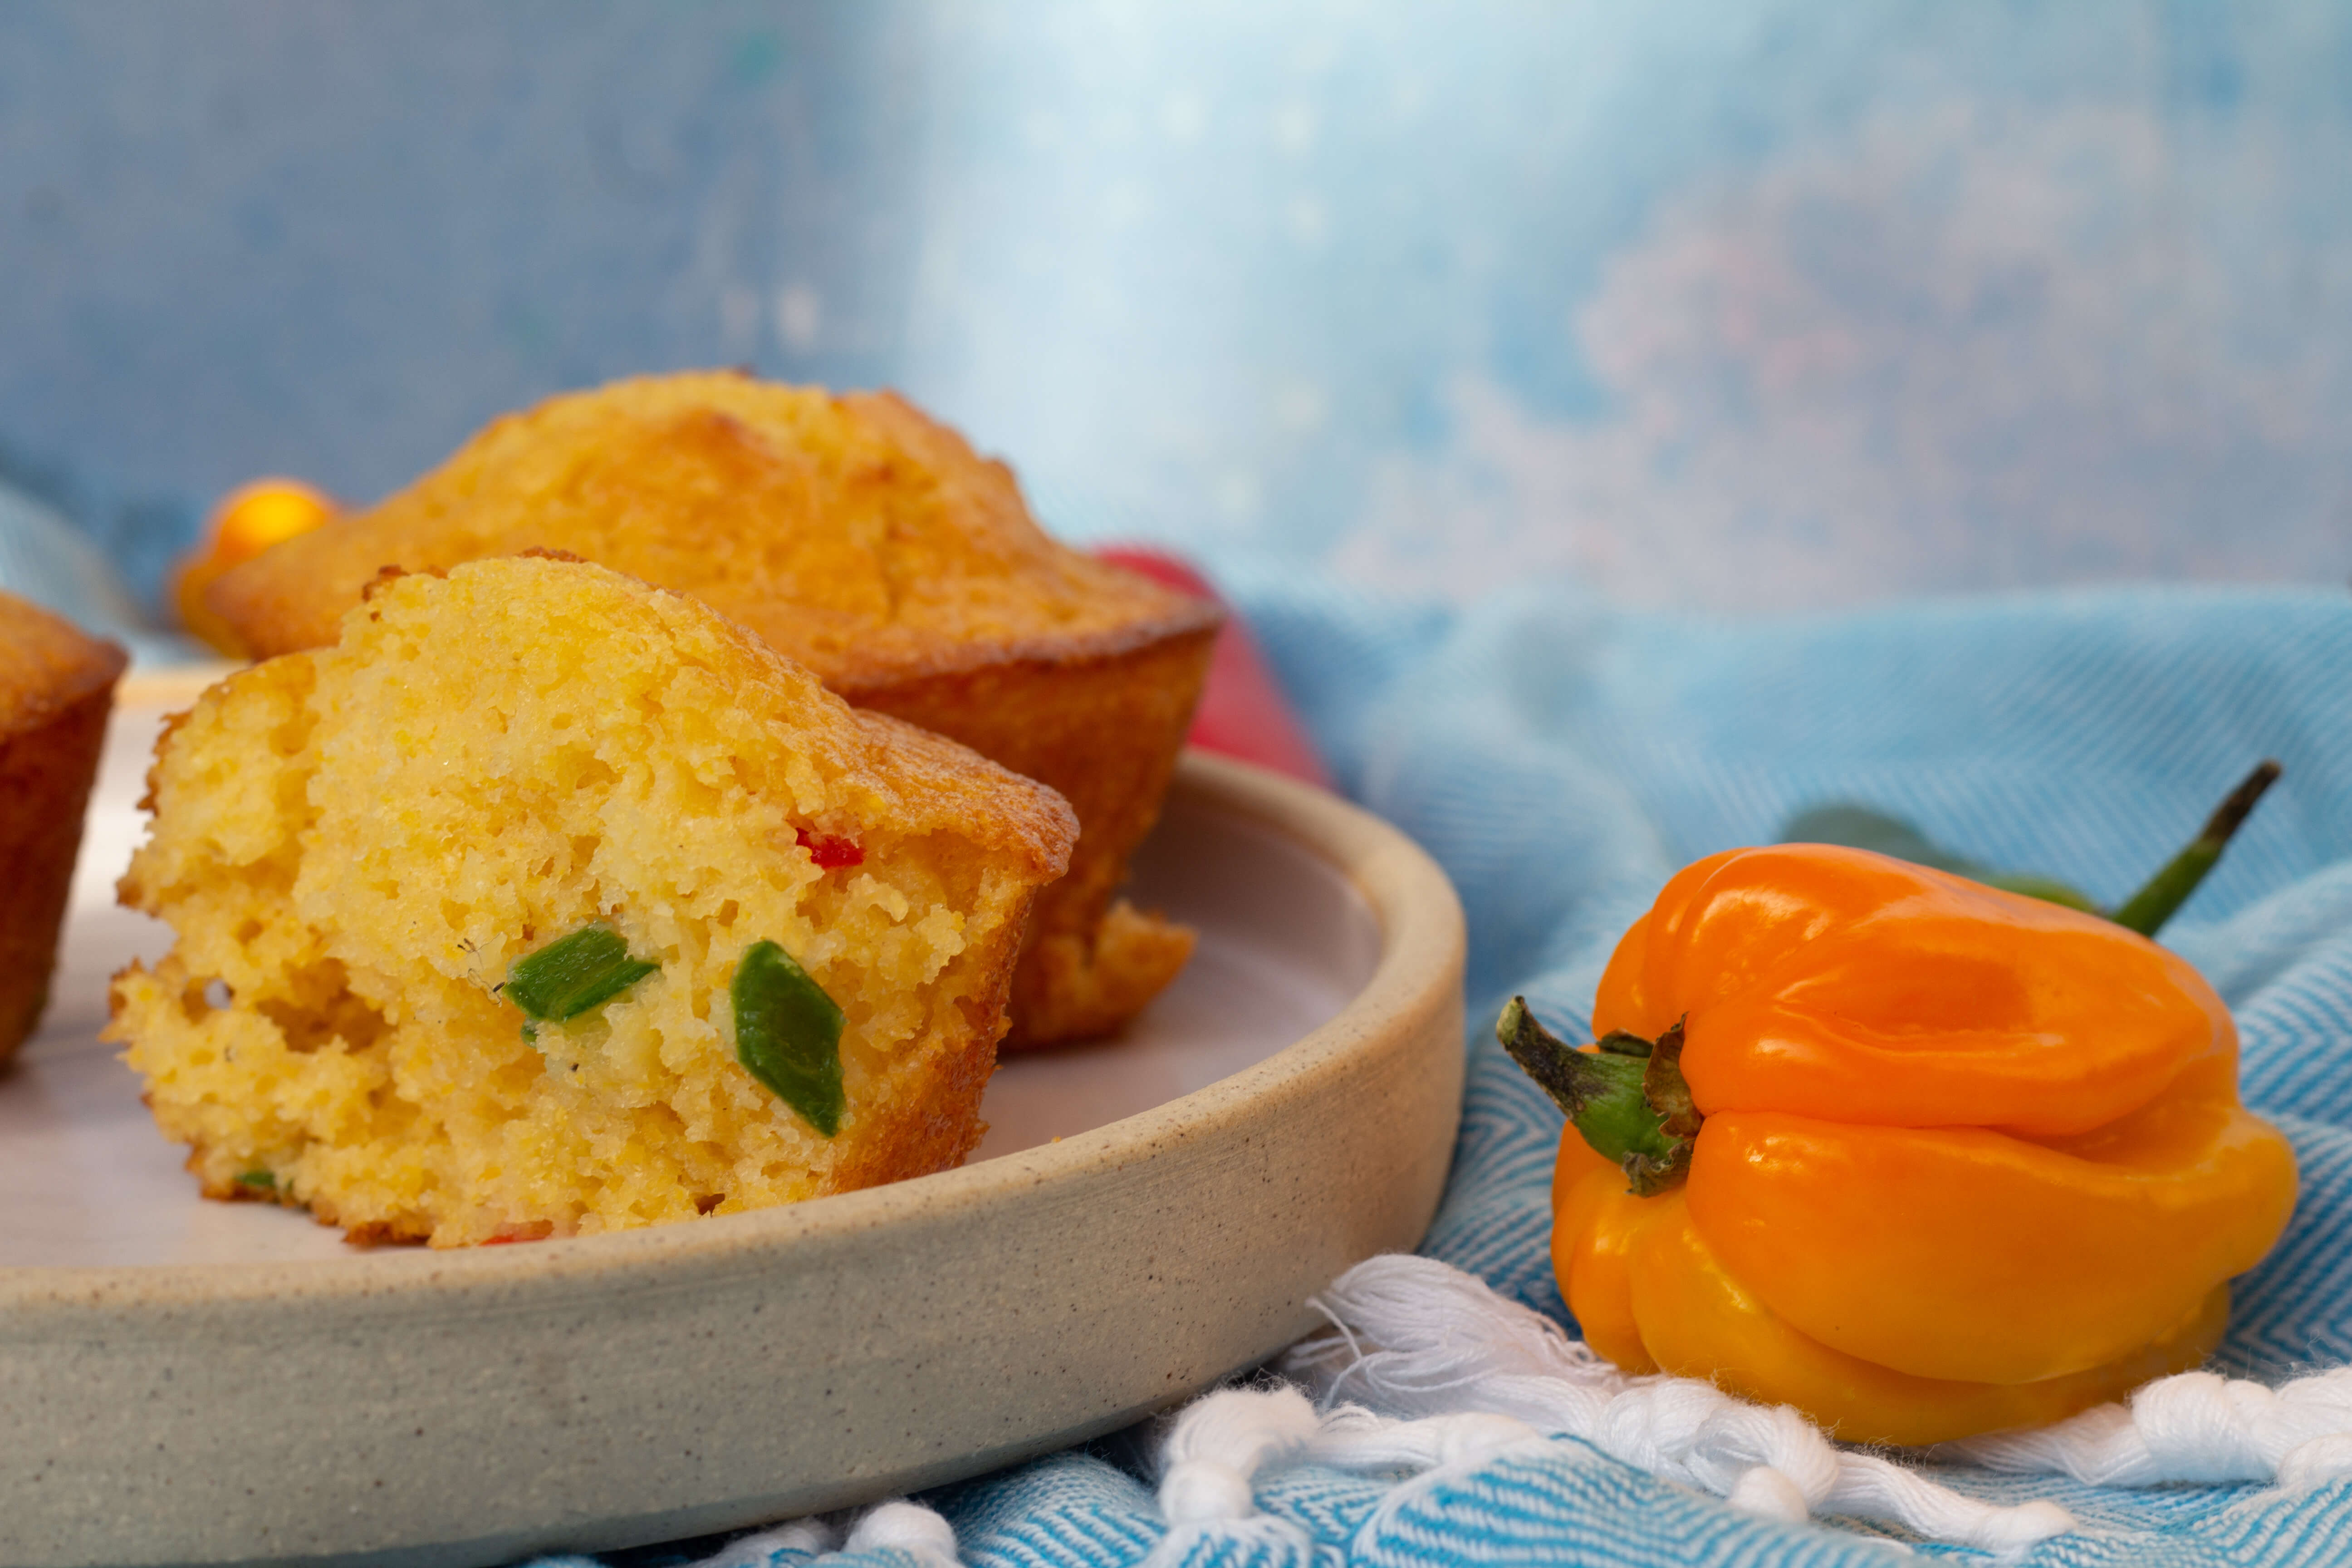
I spent a few years living in Chicago and a staple BBQ side dish that I fell in love with was the cornbread muffin. If you add some chopped chillies as well you get the perfect balance of sweetness from the muffin and heat from the chillies. Often jalapeños are used as the chilli of choice. I love an Aji lemon chilli in them but use whatever chilli you love.

Mix it up – You can also throw in some chopped chives or any fresh herbs you have growing. Go ahead and make your own fantastic and fresh combination.

Makes 12 muffins

Ingredients:
160g cornmeal (also called polenta)
145g plain flour
1 tablespoon baking powder
100g caster sugar
1 teaspoon salt
240ml milk
60g butter, melted
2 large eggs
60 ml honey
2 jalapeños, finely chopped (or your favourite chillies)

Instructions:
• Preheat the oven to 200C/180C Fan.
• In a large bowl, mix the dry ingredients together – cornmeal, flour, baking powder, sugar and salt.
• In a separate mixing bowl, whisk together the milk, eggs, melted butter and honey.
• Add the wet to the dry ingredients and stir until just combined and there are no lumps.
• Gently mix in the chopped chillies.
• Grease the muffin tin, or line with muffin cases and fill 2/3 full with the mixture.
• Place the muffin tin on a baking tray and bake for 15 minutes, until golden brown and you can insert a skewer and it comes comes out clean.
• Allow muffins to cool for a couple of minutes in the tin, then transfer them to a cooling rack.
• Best eaten warm but can be stored in an airtight container for a few days.

Chilli cornbread muffins
 
Save Print
Prep time
10 mins
Cook time
15 mins
Total time
25 mins
 
Author: CluckMuckCook
Serves: 12
Ingredients
  • Ingredients:
  • 160g cornmeal (also called polenta)
  • 145g plain flour
  • 1 tablespoon baking powder
  • 100g caster sugar
  • 1 teaspoon salt
  • 240ml milk
  • 60g butter, melted
  • 2 large eggs
  • 60 ml honey
  • 2 jalapeños, finely chopped (or your favourite chillies)
Instructions
  1. • Preheat the oven to 200C/180C Fan.
  2. • In a large bowl, mix the dry ingredients together - cornmeal, flour, baking powder, sugar and salt.
  3. • In a separate mixing bowl, whisk together the milk, eggs, melted butter and honey.
  4. • Add the wet to the dry ingredients and stir until just combined and there are no lumps.
  5. • Gently mix in the chopped chillies.
  6. • Grease the muffin tin, or line with muffin cases and fill ⅔ full with the mixture.
  7. • Place the muffin tin on a baking tray and bake for 15 minutes, until golden brown and you can insert a skewer and it comes comes out clean.
  8. • Allow muffins to cool for a couple of minutes in the tin, then transfer them to a cooling rack.
  9. • Best eaten warm but can be stored in an airtight container for a few days
3.5.3251


Vegan hot cross scones

2 March 25, 2019 Bake with the kids

Vegan Hot Cross Scones

I have had some great fun playing around with some Vegan baking over the last few weeks. Something I was a little skeptical about to start with if I am honest, more from my lack of understanding around Vegan baking.

But I tried a few great recipes from the Little Blog of Vegan who I follow on Instagram, which have been delicious, especially the carrot cake and this got me intrigued.

I think the key is to make things that can stand in their own right and where the non vegan equivalent is not so dairy and egg laden that you struggle to get the same textures and flavours.

So it was perfect timing when I was prepping for an Easter baking class that I was presenting with Bake with a Legend that I was asked if I could make the hot cross scones vegan.

Vegan hot cross scones


It was such a simple switch. I swapped out the butter for dairy free spread and the buttermilk for almond milk with a squeeze of lemon to give it the acidity needed to help the rise.

They came out tasting delicious, warmly spiced, full of fruit and with exactly that same texture. I have come to realize how inclusive Vegan baking can be. I am tempted to build out a class just around Vegan baking now.


Vegan hot cross scones

Makes 8-10 Scones

Ingredients:
225g self-raising flour, plus extra
for dusting
75g dairy free spread (I used Flora)
40g light muscovado sugar
125g mixed dried fruits
½ tsp ground mixed spice
4 1/2 tbsp of your favorite dairy free milk (I used Alpro)
1/2 tbsp of lemon juice
A little dairy free milk to glaze
50g plain flour
2 tbsp caster sugar

Instructions:

  1. Preheat the oven to 220°C/ Fan 200°C/ Gas 7.
  2. Sift the self-raising flour into a large bowl and rub in the dairy free spread with your fingertips.
  3. Stir in the sugar, fruits and spice.
  4. In a jug, mix together the dairy free milk and lemon juice. Pour into the flour mixture and bring together to make a soft dough with your hands. Don’t worry if it seems sticky and a little wet.
  5. Dust a work surface with extra flour, then roll out the dough to no thinner than 2cm.
  6. Using a 4cm cutter, cut out the scones– try not to twist the cutter, as this makes the scones rise unevenly.
  7. Re-roll the off cuts and cut out more. You should get between 8-10 scones.
  8. Place on a baking sheet lined with parchment.

For the crosses:

  1. Mix together the plain flour and 1-2 tablespoons of water and knead to make a smooth dough.
  2. Roll out, cut into thin strips and put a cross on top of each scone. Brush with non dairy milk, then bake for 15 minutes, until well risen and golden.

For the glaze:

  1. Dissolve the sugar in 2 tablespoons boiling water.
  2. Use to brush the tops of the scones as soon as they come out of the oven.


Cool slightly on a wire rack. Best eaten while warm but once cooled can be kept in an airtight tin for a few days.


5.0 from 1 reviews
Vegan Hot Cross Scones
 
Save Print
Prep time
15 mins
Cook time
15 mins
Total time
30 mins
 
The ultimate Vegan / Dairy free "Hot Cross Scone" . A lovely warmly spiced , light scone , packed full of fruit and delicious eaten warm out of the oven . A great inclusive Easter bake that everyone can enjoy.
Author: CluckMuckCook
Serves: 8-10
Ingredients
  • Makes 8-10 Scones
  • Ingredients:
  • 225g self-raising flour, plus extra
  • for dusting
  • 75g dairy free spread (I used Flora)
  • 40g light muscovado sugar
  • 125g mixed dried fruits
  • ½ tsp ground mixed spice
  • 4½ tbsp of your favorite dairy free milk (I used Alpro)
  • ½ tbsp of lemon juice
  • A little dairy free milk to glaze
  • 50g plain flour
  • 2 tbsp caster sugar
Instructions
  1. Preheat the oven to 220°C/ Fan 200°C/ Gas 7.
  2. Sift the self-raising flour into a large bowl and rub in the dairy free spread with your fingertips.
  3. Stir in the sugar, fruits and spice.
  4. In a jug, mix together the dairy free milk and lemon juice. Pour into the flour mixture and bring together to make a soft dough with your hands. Don't worry if it seems sticky and a little wet.
  5. Dust a work surface with extra flour, then roll out the dough to no thinner than 2cm.
  6. Using a 4cm cutter, cut out the scones– try not to twist the cutter, as this makes the scones rise unevenly.
  7. Re-roll the off cuts and cut out more. You should get between 8-10 scones.
  8. Place on a baking sheet lined with parchment.
  9. For the crosses:
  10. Mix together the plain flour and 1-2 tablespoons of water and knead to make a smooth dough.
  11. Roll out, cut into thin strips and put a cross on top of each scone. Brush with non dairy milk, then bake for 15 minutes, until well risen and golden.
  12. For the glaze:
  13. Dissolve the sugar in 2 tablespoons boiling water.
  14. Use to brush the tops of the scones as soon as they come out of the oven.
3.5.3251


1 March 14, 2019 Bake with the kids

Vegan Biscoff Sweet Rolls

I have been inspired by a lot of vegan baking posts of late, especially the Little Blog of Vegan, whose bakes always look so delicious, so I committed to a weekend of Vegan baking, Alongside a vegan carrot cake for work and a vegan no bake Lotus Biscoff tart for home, I also wanted to develop something new. I love baking bread and also have a passion for Lotus Biscoff biscuits. So I set about trying to bring the flavour of speculoos, which is basically what a biscoff biscuit is, into a roll that had a little bit of sweetness but not too much and had to have those lovely spice flavours.

Biscoff Sweet Rolls

Biscoff Sweet Rolls

As always with anything Biscoff related, my youngest son volunteers as chief tester and he is a hard judge to please. A few attempts later I got the thumbs up, the rolls being the right consistency and they had enough spices to amp up the actual Biscoff spread also added to the dough.

Biscoff Sweet Rolls

Biscoff Sweet Rolls

These are easy enough to make and are delicious slightly warm but can also be stored in an airtight box for a day or two.

With the amount of Lotus Biscoff biscuits we get through in our house you would think we are sponsored by them, sadly not, we are just addicts 😉

Makes 9-10 rolls

INGREDIENTS
130g warm water
250g white bread flour
1 teaspoon dry yeast
25g soft brown sugar
60g Biscoff spread
1 teaspoon vanilla bean extract
1/2 teaspoon salt
1/2 teaspoon cinnamon
1/8 teaspoon nutmeg
1/8 teaspoon ground ginger
1/8 teaspoon ground cloves
30g vegetable oil (I use rapeseed oil)
Icing sugar to dust

Method

  1. Whisk together the hand warm water with the Biscoff spread, brown sugar, vanilla extract and yeast.
  2. In the bowl of a stand mixer with a dough hook, mix together the flour, salt and spices.
  3. Pour in the liquid mixture and add the oil.
  4. Knead for 7 minutes in the mix until the dough is smooth and elastic. If doing this by hand, knead for about 10 minutes.
  5. Place the dough into a lightly oiled bowl, cover with clingfilm and allow to rise in a warm place until doubled in size (about 2 hours).
  6. Once risen, knead for a minute to knock the air out and divide the dough into 50g balls. You should get around 9-10.
  7. Line a baking tray with baking parchment.
  8. Shape each piece of dough into a tight ball and place them onto the baking tray giving them room to rise.
  9. Oil a piece of cling film and gently lay over the top of the rolls to stop them drying out.
  10. Allow to rise again until they are double in size.
  11. Preheat the oven to 180 degrees C /160 degrees C Fan, and bake for about 15 minutes, until golden.
  12. Dust with some icing sugar on top.

Vegan Biscoff Sweet Rolls
 
Save Print
Prep time
15 mins
Cook time
15 mins
Total time
30 mins
 
Delicious light and fluffy vegan Biscoff sweet rolls,a little bit of sweetness, but not too much and had to have those lovely spice flavours.
Author: CluckMuckCook
Serves: 10
Ingredients
  • 130g warm water
  • 250g white bread flour
  • 1 teaspoon dry yeast
  • 25g soft brown sugar
  • 60g Biscoff spread
  • 1 teaspoon vanilla bean extract
  • ½ teaspoon salt
  • ½ teaspoon cinnamon
  • ⅛ teaspoon nutmeg
  • ⅛ teaspoon ground ginger
  • ⅛ teaspoon ground cloves
  • 30g vegetable oil (I use rapeseed oil)
  • Icing sugar to dust
Instructions
  1. Whisk together the hand warm water with the Biscoff spread, brown sugar, vanilla extract and yeast.
  2. In the bowl of a stand mixer with a dough hook, mix together the flour, salt and spices.
  3. Pour in the liquid mixture and add the oil.
  4. Knead for 7 minutes in the mix until the dough is smooth and elastic. If doing this by hand, knead for about 10 minutes.
  5. Place the dough into a lightly oiled bowl, cover with clingfilm and allow to rise in a warm place until doubled in size (about 2 hours).
  6. Once risen, knead for a minute to knock the air out and divide the dough into 50g balls. You should get around 9-10.
  7. Line a baking tray with baking parchment.
  8. Shape each piece of dough into a tight ball and place them onto the baking tray giving them room to rise.
  9. Oil a piece of cling film and gently lay over the top of the rolls to stop them drying out.
  10. Allow to rise again until they are double in size.
  11. Preheat the oven to 180 degrees C /160 degrees C Fan, and bake for about 15 minutes, until golden.
  12. Dust with icing sugar
3.5.3251


4 November 29, 2018 Bake with the kids

Chocolate beetroot brownies

This year I had the pleasure to perform some baking demos at the Lichfield food festival. I love these types of events as I get to share my passion for baking with a live audience and often get to meet up with other bakers and chefs.

At the festival I was overjoyed to be on on the same day as Val Stones. She was a previous contestant on the Great British Bake Off and I am a big fan. When I met her it was like we had known each other for years. She is such a warm and lovely person and we had a great time chatting about our experiences and helping each other out when we were demoing and clearing up.

The organiser, knowing I loved a challenge, gave me a call about a week before the show and mentioned one of the sponsors would love it if I could incorporate beetroot into one of my bakes. I had wanted to play around with a beetroot brownie recipe I had seen on Waitrows website, the allotment was awash with them and so my chocolate beetroot brownie was born. Rich, gooey, earthy sweet goodness.

Ingredients:
75g unsalted butter, at room temperature, plus extra for greasing
350g raw beetroot, trimmed and cut into large wedges
300g dark chocolate, chopped
2 eggs
200g granulated sugar
2 tsp vanilla bean paste (or extract)
1 tsp salt
40g plain flour
40g cocoa powder
Shot of espresso
75g icing sugar, sifted

Method:

1. Pre heat the oven to 180 ̊C, 160 ̊C Fan.
2. Grease and line a 20cm x 30cm baking tin with baking parchment.
3. Peel the beetroot, chop into even chunks and add to a pan of water
4. Bring to the boil and cook until soft and tender – about 1 hour.
5. Drain in a sieve, pop into a food processor and blitz to a purée. Keep 1 tbsp purée for the icing.
6. Melt the chocolate with the butter in a large heatproof bowl over a pan of simmering water.
7. Leave to cool for about 10 minutes and whisk in the eggs, granulated sugar, vanilla, espresso, beetroot purée and salt into the chocolate.
8. Add the flour and cocoa, fold everything in until just combined.
9. Pour into the tin and bake for 35-40 minutes, until it looks cooked and shiny on top and cracks have just started to appear.
10. Cool completely in the tin then put in the fridge for a couple of hours or overnight before serving.
11. Whisk the reserved beetroot purée in with the icing sugar and drizzle over the top

Beetroot chocolate brownies
 
Save Print
Prep time
20 mins
Cook time
40 mins
Total time
1 hour
 
Delicious rich chocolate and beetroot brownies.
Author: CluckMuckCook
Serves: 18
Ingredients
  • Ingredients:
  • 75g unsalted butter, at room temperature, plus extra for greasing
  • 350g raw beetroot, trimmed and cut into large wedges
  • 300g dark chocolate, chopped
  • 2 eggs
  • 200g granulated sugar
  • 2 tsp vanilla bean paste (or extract)
  • 1 tsp salt
  • 40g plain flour
  • 40g cocoa powder
  • Shot of espresso
  • 75g icing sugar, sifted
Instructions
  1. Pre heat the oven to 180 ̊C, 160 ̊C Fan.
  2. Grease and line a 20cm x 30cm baking tin with baking parchment.
  3. Peel the beetroot, chop into even chunks and add to a pan of water
  4. Bring to the boil and cook until soft and tender – about 1 hour.
  5. Drain in a sieve, pop into a food processor and blitz to a purée. Keep 1 tbsp purée for the icing.
  6. Melt the chocolate with the butter in a large heatproof bowl over a pan of simmering water.
  7. Leave to cool for about 10 minutes and whisk in the eggs, granulated sugar, vanilla, espresso, beetroot purée and salt into the chocolate.
  8. Add the flour and cocoa, fold everything in until just combined.
  9. Pour into the tin and bake for 35-40 minutes, until it looks cooked and shiny on top and cracks have just started to appear.
  10. Cool completely in the tin then put in the fridge for a couple of hours or overnight before serving.
  11. Whisk the reserved beetroot purée in with the icing sugar and drizzle over the top
3.5.3251


11 November 6, 2018 Bake with the kids

Parmesan and Gruyere cheese biscuits.

The clocks have gone back, Halloween has passed, we’ve been through bonfire night and now it’s time to look towards Christmas.

Last night I looked through some old photos of what I baked last Christmas and I realised that I’ve never posted the recipe to these delicious cheese biscuits.

These parmesan and gruyere cheese biscuits are so buttery and melt in the mouth. They would make a perfect little gift for a Christmas hamper or just a great little snack to take round when you’re visiting friends over the festive period.

In reality though you will make a batch, try one, then devour the lot yourself. If you want a little smokey hit rather than heat, switch out the cayenne for paprika.

Ingredients:

75g plain flour
75g cold unsalted butter, cubed
50g Gruyère cheese, grated
25g Parmesan cheese, grated. Plus a little extra to sprinkle on top.
Pinch of cayenne chilli powder (add a bigger pinch if you like a little heat).
Ground black pepper

Method:

  1. Add flour, cayenne and a good grind of black pepper into a bowl or food processor.
  2. Add the butter and rub in lightly with your fingertips, or blitz in food processor until the mixture resembles breadcrumbs.
  3. Add the cheese to the mixture. If using a food processor, pulse until combined.
  4. Bring the mixture together with your hands until it creates a soft dough.
  5. Wrap the dough in cling film and chill in the fridge for 30 minutes.
  6. Preheat the oven to 200˚C/180˚C fan/Gas Mark 7 and line two baking trays with baking parchment.
  7. Roll out the dough on a lightly floured surface to around 3-4 mm, or the thickness of a pound coin.
  8. Using a cookie cutter of your choice, cut out the biscuits, around a 5cm size is good. You can re roll the dough until it is all used.
  9. Place on the tray to allow some spreading.
  10. Chill for another 30 minutes to prevent too much spread.
  11. Bake for 10 minutes or so, until lightly browned at the edges.
  12. Grind some pepper over them together with a little sprinkle of leftover Parmesan.
  13. Leave on the baking trays for a couple of minutes to firm up, then carefully move to a wire rack wire rack to cool completely.

Parmesan and Gruyere cheese biscuits.
 
Save Print
These parmesan and gruyere cheese biscuits are so buttery and melt in the mouth. They would make a perfect little gift for a Christmas hamper or just a great little snack to take round when you’re visiting friends over the festive period.
Author: CluckMuckCook
Ingredients
  • Ingredients:
  • 75g plain flour
  • 75g cold unsalted butter cubed
  • 50g Gruyère cheese, grated
  • 25g Parmesan cheese, grated. Plus a little extra to sprinkle on top.
  • Pinch of cayenne chilli powder (add a bigger pinch if you like a little heat).
  • Ground black pepper
  • .
Instructions
  1. Add flour, cayenne and a good grind of black pepper into a bowl or food processor.
  2. Add the butter and rub in lightly with your fingertips, or blitz in food processor until the mixture resembles breadcrumbs.
  3. Add the cheese to the mixture. If using a food processor, pulse until combined.
  4. Bring the mixture together with your hands until it creates a soft dough.
  5. Wrap the dough in cling film and chill in the fridge for 30 minutes.
  6. Preheat the oven to 200˚C/180˚C fan/Gas Mark 7 and line two baking trays with baking parchment.
  7. Roll out the dough on a lightly floured surface to around 3-4 mm, or the thickness of a pound coin.
  8. Using a cookie cutter of your choice, cut out the biscuits, around a 5cm size is good. You can re roll the dough until it is all used.
  9. Place on the tray to allow some spreading.
  10. Chill for another 30 minutes to prevent too much spread.
  11. Bake for 10 minutes or so, until lightly browned at the edges.
  12. Grind some pepper over them together with a little sprinkle of leftover Parmesan.
  13. Leave on the baking trays for a couple of minutes to firm up, then carefully move to a wire rack wire rack to cool completely.
3.5.3251


Salted caramel fudge

4 September 9, 2018 Bake with the kids

Salted Caramel Maple Fudge

I caught a cooking program on tv this week where they were making homemade fudge.

This brought on a wave of nostalgia of when, as kids, my brother and I used to go to my Nan’s for a week during the summer holidays to catch up with our cousins.

When we arrived, Nan had always made us either fudge or honeycomb to welcome us for the summer. This would fuel us for all the trips she had planned or for spending the day playing at my cousin’s farm.

Salted caramel fudge

The summers always seem hot and lasted forever. Our cousin’s farm was one big adventure playground. We camped in the woods, told scary stories, explored the chalk caves and swam in the freezing, unheated pool. Or Nan packed us all up in her mark 1 Ford Cortina, with the plastic still on the seats to protect them, for a day on the Kent coast and hours on the dodgems.

Salted caramel fudge

Amazing what memories a bit of homemade fudge can bring rushing back!

Ingredients:

395g can condensed milk
120g soft brown sugar
125g diced butter
2 tablespoons glucose syrup
60g maple syrup
180g chopped white chocolate
1 teaspoon sea salt flakes

Method:

1. Line a 20cm square cake tin with baking parchment.

2. Put the condensed milk, sugar, butter, glucose syrup and maple syrup in a heavy bottomed saucepan and gentle warm over a low heat.

3. Keep stirring, without boiling, until everything has dissolved and the mixture looks nice and glossy. This will take about 10 minutes. If you don’t take your time at this stage the fudge will taste grainy.

4. Turn up the heat to medium and bring to a simmer, constantly stirring.

5. Keep simmering and stirring until the mixture thickens, bubbles like lava and pulls away from the edge of the pan. This will take 6-8 minutes. If you have a sugar thermometer you are looking for a temperature of around 115C/239F.

6. Now you have to work quickly, take off the heat and stir in the chocolate until melted and combined.

7. Carefully pour into the prepared cake tin and smooth out, it will start to set quickly. Sprinkle with sea salt and leave to cool for 30 minutes. Cover with cling film and pop it in the fridge until firm. A couple of hours should do.

Salted Caramel Maple Fudge
 
Save Print
Prep time
5 mins
Cook time
30 mins
Total time
35 mins
 
Traditional rich buttery salted caramel maple fudge. Brings back the nostalgia of my Nans fudge eaten on lazy summer holidays with the family in Kent.
Author: CluckMuckCook
Serves: 24 pieces
Ingredients
  • 395g can condensed milk
  • 120g soft brown sugar
  • 125g diced butter
  • 2 tablespoons glucose syrup
  • 60g maple syrup
  • 180g chopped white chocolate
  • 1 teaspoon sea salt flakes
Instructions
  1. I caught a cooking program on tv this week where they were making homemade fudge.
  2. This brought on a wave of nostalgia of when, as kids, my brother and I used to go to my Nan’s for a week during the summer holidays to catch up with our cousins.
  3. When we arrived,Nan had always made us either fudge or honeycomb to welcome us for the summer. This would fuel us for all the trips she had planned or for spending the day playing at my cousin’s farm.
  4. The summers always seem hot and lasted forever. Our cousin’s farm was one big adventure playground. We camped in the woods, told scary stories, explored the chalk caves and swam in the freezing, unheated pool. Or Nan packed us all up in her mark 1 Ford Cortina, with the plastic still on the seats to protect them, for a day on the Kent coast and hours on the dodgems.
  5. Amazing what memories a bit of homemade fudge can bring rushing back!
3.5.3251

easter chocolate cornflake nests

3 March 22, 2018 Bake with the kids

Easter Chocolate Cornflake Nests

Ethan my youngest was keen to do some Easter baking with me and Oliver my eldest wanted to practise some photography. This relegated me to chief bottle washer and supervisor which I was more than happy with, as I had already spent a lot of time in the kitchen making hot cross buns.

easter chocolate cornflake nests

I love spending time in the kitchen with the boys as it makes me nostalgic for the time I used to spend in the kitchen with my Dad. Relaxing and chatting for 30 minutes, with no interruptions from social media, the Xbox or phones is such a joy and rare in our hectic lives.

With nostalgia being the theme, we agreed on a very simple recipe I remember making as a young lad, which Ethan could nail and that would look great when Oliver grabbed the camera.

easter chocolate cornflake nests

Not sure if calling it baking is stretching the skills needed, but if you can melt stuff, stir and spoon into cupcake cases then this is the recipe for you.

Ingredients:
225g plain chocolate, broken into pieces
2 tbsp golden syrup
50g unsalted butter
75g cornflakes
2 bags of Cadbury mini chocolate eggs

Method:

  1. Line a 12-hole muffin tin with paper cupcake cases.
  2. In a bowl set on a pan of simmering water, gently melt the chocolate, golden syrup and butter, stirring until smooth and fully combined.
  3. Gently fold in the cornflakes until totally coated in the chocolate.
  4. Divide the mixture between the 12 paper cases and pop 3 chocolate eggs into the centre of each nest.
  5. Chill in the fridge until completely set.

Easter chocolate cornflake nests
 
Save Print
Prep time
15 mins
Total time
15 mins
 
Old school chocolate cornflake nests for Easter.
Author: CluckMuckCook
Serves: 12
Ingredients
  • Ingredients:
  • 225g plain chocolate, broken into pieces
  • 2 tbsp golden syrup
  • 50g unsalted butter
  • 75g cornflakes
  • 2 bags of Cadbury mini chocolate eggs
Instructions
  1. Line a 12-hole muffin tin with paper cupcake cases.
  2. In a bowl set on a pan of simmering water, gently melt the chocolate, golden syrup and butter, stirring until smooth and fully combined.
  3. Gently fold in the cornflakes until totally coated in the chocolate.
  4. Divide the mixture between the 12 paper cases and pop 3 chocolate eggs into the centre of each nest.
  5. Chill in the fridge until completely set
3.5.3229


Blood Orange Drizzle Cake

0 February 26, 2018 Bake with the kids

Blood Orange Drizzle Cake

This time of year I go crazy for sweet vibrant blood oranges. They bring a ray of sunshine into a season of dreary fruit. So what better way to use the oranges than in a drizzle cake. Perfect for a lazy Sunday afternoon with a cuppa after a bracing dog walk with Chester our Cockerpoo.

Blood Orange Drizzle Cake

It is super simple to make and the kids can join in too. The sponge is basically a Victoria sandwich recipe, but when filled with the zest and a little juice of the oranges, it is transformed into a citrus delight. Then it is crowned with a sweet zesty orange syrup that oozes into the cake to make it super moist.

OK I am dribbling, I need to go and grab a slice.

Ingredients:

175g unsalted butter, softened, plus extra for greasing
175g light brown soft sugar
175g plain flour
3 medium eggs
1 tsp baking powder
3 blood oranges (normal oranges will also work)
1/2 tsp orange extract (optional)
50g caster sugar

Method:

  1. Grease and line a 2lb loaf tin with baking parchment.
  2. Preheat the oven to 180˚C (160c Fan), Gas 4.
  3. In a stand mixer or with an electric hand whisk, cream the butter, brown sugar and zest of 2 oranges until light and fluffy.
  4. Scrape down the sides of the bowl and add the eggs one at a time. If it starts to curdle, add a couple of tablespoons of flour.
  5. Add the remaining flour and baking powder, a tablespoon of the juice of one of the oranges (and orange extract if using) and mix until combined.
  6. Pour into the lined loaf tin and bake for 45-55 minutes. Poke a skewer into the middle of the cake and if it comes out clean it is done.
  7. Whilst the cake is in the oven, put the caster sugar in a small pan with about 6 tablespoons of orange juice and the zest of the remaining orange and simmer until the sugar has dissolved.
  8. When the cake comes out of the oven, pierce the top all over with a skewer. Then pour on the orange syrup you have made.
  9. Leave to cool completely in the tin before removing.

Blood Orange Drizzle Cake
 
Save Print
Prep time
20 mins
Cook time
45 mins
Total time
1 hour 5 mins
 
This time of year I go crazy for sweet vibrant blood oranges. They bring a ray of sunshine into a season of dreary fruit. So what better way to use the oranges than in a drizzle cake. Perfect for a lazy Sunday afternoon with a cuppa after a bracing dog walk with Chester our Cockerpoo.
Author: CluckMuckCook
Serves: 1
Ingredients
  • 175g unsalted butter, softened, plus extra for greasing
  • 175g light brown soft sugar
  • 175g plain flour
  • 3 medium eggs
  • 1 tsp baking powder
  • 3 blood oranges (normal oranges will also work)
  • ½ tsp orange extract (optional)
  • 50g caster sugar
Instructions
  1. Grease and line a 2lb loaf tin with baking parchment.
  2. Preheat the oven to 180˚C (160c Fan), Gas 4.
  3. In a stand mixer or with an electric hand whisk, cream the butter, brown sugar and zest of 2 oranges until light and fluffy.
  4. Scrape down the sides of the bowl and add the eggs one at a time. If it starts to curdle, add a couple of tablespoons of flour.
  5. Add the remaining flour and baking powder, a tablespoon of the juice of one of the oranges (and orange extract if using) and mix until combined.
  6. Pour into the lined loaf tin and bake for 45-55 minutes. Poke a skewer into the middle of the cake and if it comes out clean it is done.
  7. Whilst the cake is in the oven, put the caster sugar in a small pan with about 6 tablespoons of orange juice and the zest of the remaining orange and simmer until the sugar has dissolved.
  8. When the cake comes out of the oven, pierce the top all over with a skewer. Then pour on the orange syrup you have made.
  9. Leave to cool completely in the tin before removing.
3.5.3229


Lotus Biscoff Biscuit Blondies

79 January 16, 2018 Bake with the kids

Lotus Biscoff Biscuit Blondies

My boys absolutely love Lotus Biscoff biscuits. If we were ever out for a meal and I had an espresso and these biscuits were served on the side , I would not get a look in.  Then Pizza Express started doing a Biscoff cheesecake and my biscuits were safe as my youngest would want his own cheese cake desert.

Lotus Biscoff Biscuit Blondies

That got me thinking as to what I could make that was based on these biscuits. It needed to be quick and easy to get the kids involved. I landed on the blondie as the vehicle to carry the delicious biscoff caramel flavour.

Blondies are even easier to make than brownies. Just melt the butter, sugar, spread and vanilla together. Let it cool a bit. Mix in an egg, flour and some crushed biscuits and you are pretty much done. 10 minutes to make, which even my kids can pay attention for and then 20 minutes baking. Job done.

Lotus Biscoff Biscuit Blondies

After the kids gave them the thumbs up, I took a batch into the office for some more discerning feedback and they were a resounding success. They have become one of the top 3 bakes I have taken into the office in their mental score sheet.

Makes: 10-12 blondies
Oven Temp: Gas 4, 350F, 180C (160C Fan)

Ingredients:
75g butter
220g dark brown sugar
1 teaspoon vanilla extract
Pinch of salt
1 large egg
140g plain flour
100g Lotus Biscoff Biscuit Spread
20 -22 Lotus Biscoff Biscuits

Instructions:
Pre-heat oven to 180c (160c) Fan and line a square 9 inch baking tin with baking parchment.
Melt the butter gently in a saucepan along with the dark brown sugar, salt, Biscoff biscuit spread and vanilla extract until all melted and combined together.
Allow to cool for 5 minutes and then whisk in the egg.
Add the flour to the wet ingredients and fold in gently until combined.
Crush 8 biscuits and gently fold into the mixture.
Spread the mixture evenly into the tin, then place the remaining biscuits on top.
Bake for 20-25 minutes until golden on top but still a little squidgy in the middle.
Leave to cool in the tin for 30 minutes. Then remove and cut into rectangles around the biscuits.

Lotus Biscoff Biscuit Blondies
 
Save Print
Prep time
10 mins
Cook time
20 mins
Total time
30 mins
 
My boys absolutely love Lotus Biscoff biscuits. These delicious, gooey, caramel, biscuity blondies were a resounding success with the kids and become one of the top 3 bakes I have taken into the office. So easy to make and get the kids involved.
Author: CluckMuckCook
Serves: 12
Ingredients
  • Ingredients:
  • 75g butter
  • 220g dark brown sugar
  • 1 teaspoon vanilla extract
  • Pinch of salt
  • 1 large egg
  • 140g plain flour
  • 100g Lotus Biscoff Biscuit Spread
  • 20 -22 Lotus Biscoff Biscuits
Instructions
  1. Makes: 10-12 blondies
  2. Oven Temp: Gas 4, 350F, 180C (160C Fan)
  3. Instructions:
  4. Pre-heat oven to 180c (160c) Fan and line a square 9 inch baking tin with baking parchment.
  5. Melt the butter gently in a saucepan along with the dark brown sugar, salt, Biscoff biscuit spread and vanilla extract until all melted and combined together.
  6. Allow to cool for 5 minutes and then whisk in the egg.
  7. Add the flour to the wet ingredients and fold in gently until combined.
  8. Crush 8 biscuits and gently fold into the mixture.
  9. Spread the mixture evenly into the tin, then place the remaining biscuits on top.
  10. Bake for 20-25 minutes until golden on top but still a little squidgy in the middle.
  11. Leave to cool in the tin for 30 minutes. Then remove and cut into rectangles around the biscuits.
3.5.3229


Banana bread

5 December 5, 2017 Bake with the kids

Pecan & Chocolate Chip Banana Bread

I fell back in love with banana bread over a lazy Sunday morning brunch with my two boys.  We decided to give Mum some peace and headed into one of our favourite local cafes ‘The Brentwood Kitchen’. The boys love the pancakes there . I fancied something different for a change and decided on a warm banana bread with Nutella . It was delicious. That spurred me on to develop my own recipe.

Banana bread


The one thing that slowed me down with receipe development is that my family love bananas and they never last long enough in the house to get nice, ripe, brown and spotty which is what you want for this recipe. I ended up having to hide them!

A warm slice of banana bread slathered in Nutella is delicious but I also like to drizzle over some caramel sauce as a lovely alternative. It goes brilliantly with the pecans in this recipe.

Ingredients:
285g plain flour
1 tsp bicarbonate of soda
½ tsp salt
110g butter, plus extra for greasing
225g caster sugar
2 large eggs
4 very ripe and mashed bananas
85ml buttermilk
1 tsp vanilla extract
50g chopped pecan nuts
50g choc Chips

Method:
1 Preheat the oven to 180c/160c Fan.
2 Mash up the bananas to a paste consistency.
3 Combine the flour, bicarbonate of soda, pecans, choc chips and salt into a large mixing bowl.
4 In a stand mixer or another bowl, cream the butter and sugar together until light and pale.
5 Add the eggs, bananas, buttermilk and vanilla extract to the butter and sugar mixture and mix until well combined.
6 Fold in the flour mixture gently until just combined.
7 Grease a 2lb loaf tin and pour the cake mixture into it.
8 Bake for about an hour until golden-brown and if you insert a skewer it comes out clean.
9 Remove from the oven and allow to cool in the tin for a few minutes.
10 Turn out onto a wire rack and allow to cool. Serve warm or cold with a drizzle of caramel sauce or spread with Nutella .


Pecan & Chocolate Chip Banana Bread
 
Save Print
Prep time
15 mins
Cook time
60 mins
Total time
1 hour 15 mins
 
Author: CluckMuckCook
Recipe type: Cake
Serves: 1
Ingredients
  • 285g plain flour
  • 1 tsp bicarbonate of soda
  • ½ tsp salt
  • 110g butter, plus extra for greasing
  • 225g caster sugar
  • 2 large eggs
  • 4 very ripe and mashed bananas
  • 85ml buttermilk
  • 1 tsp vanilla extract
  • 50g chopped pecan nuts
  • 50g choc Chips
Instructions
  1. Preheat the oven to 180c/160c Fan.
  2. Mash up the bananas to a paste consistency.
  3. Combine the flour, bicarbonate of soda, pecans, choc chips and salt into a large mixing bowl.
  4. In a stand mixer or another bowl, cream the butter and sugar together until light and pale.
  5. Add the eggs, bananas, buttermilk and vanilla extract to the butter and sugar mixture and mix until well combined.
  6. Fold in the flour mixture gently until just combined.
  7. Grease a 2lb loaf tin and pour the cake mixture into it.
  8. Bake for about an hour until golden-brown and if you insert a skewer it comes out clean.
  9. Remove from the oven and allow to cool in the tin for a few minutes.
  10. Turn out onto a wire rack and allow to cool. Serve warm or cold with a drizzle of caramel sauce or spread with Nutella .
3.5.3228

  • Go to page 1
  • Go to page 2
  • Go to Next Page »

Copyright© 2025 · Cookd Pro Theme by Shay Bocks