• Skip to primary navigation
  • Skip to main content
  • Home
  • About Me
  • Recipes
    • Cake
    • Biscuits
    • Bread
    • Pastry
    • Tray Bakes
    • Condiments
    • Bake with the kids
    • Anti Inflammatory Baking
  • Conversion Charts. Cups – Grams – Ounces
  • Blog

Cluck, Muck & Cook

Baking & Foodie Blog From Sunny Brentwood Essex

CluckMuckCook

Blondies slated caramel and pecan

3 August 16, 2017 Bake with the kids

Salted Caramel and Pecan Blondies

I loved Blondie, the late 70’s Punk/New Wave singer but I never really got blondies though. The non chocolatey/white chocolate alternative to brownies. Why would you have a brownie that was not full of rich and unctuous dark chocolate. That is just plain crazy.

Once I had a love and it was a gas

Soon turned out had a heart of glass

Seemed like the real thing, only to find

Mucho mistrust, love’s gone behind

Blondie- Heart of Glass

Or at least I thought until a baking and Jenga playing buddy of mine converted me with some fabulous blondies. That set me on a journey to create my own delicious gooey but not too sweet version. I dropped the white chocolate in place of a salted caramel and paired that with my favourite nut, the pecan. Whilst the macadamia may be the king of nuts and the cashew the queen. the pecan is resolutely the prince of nuts in my opinion.

Blondies slated caramel and pecan

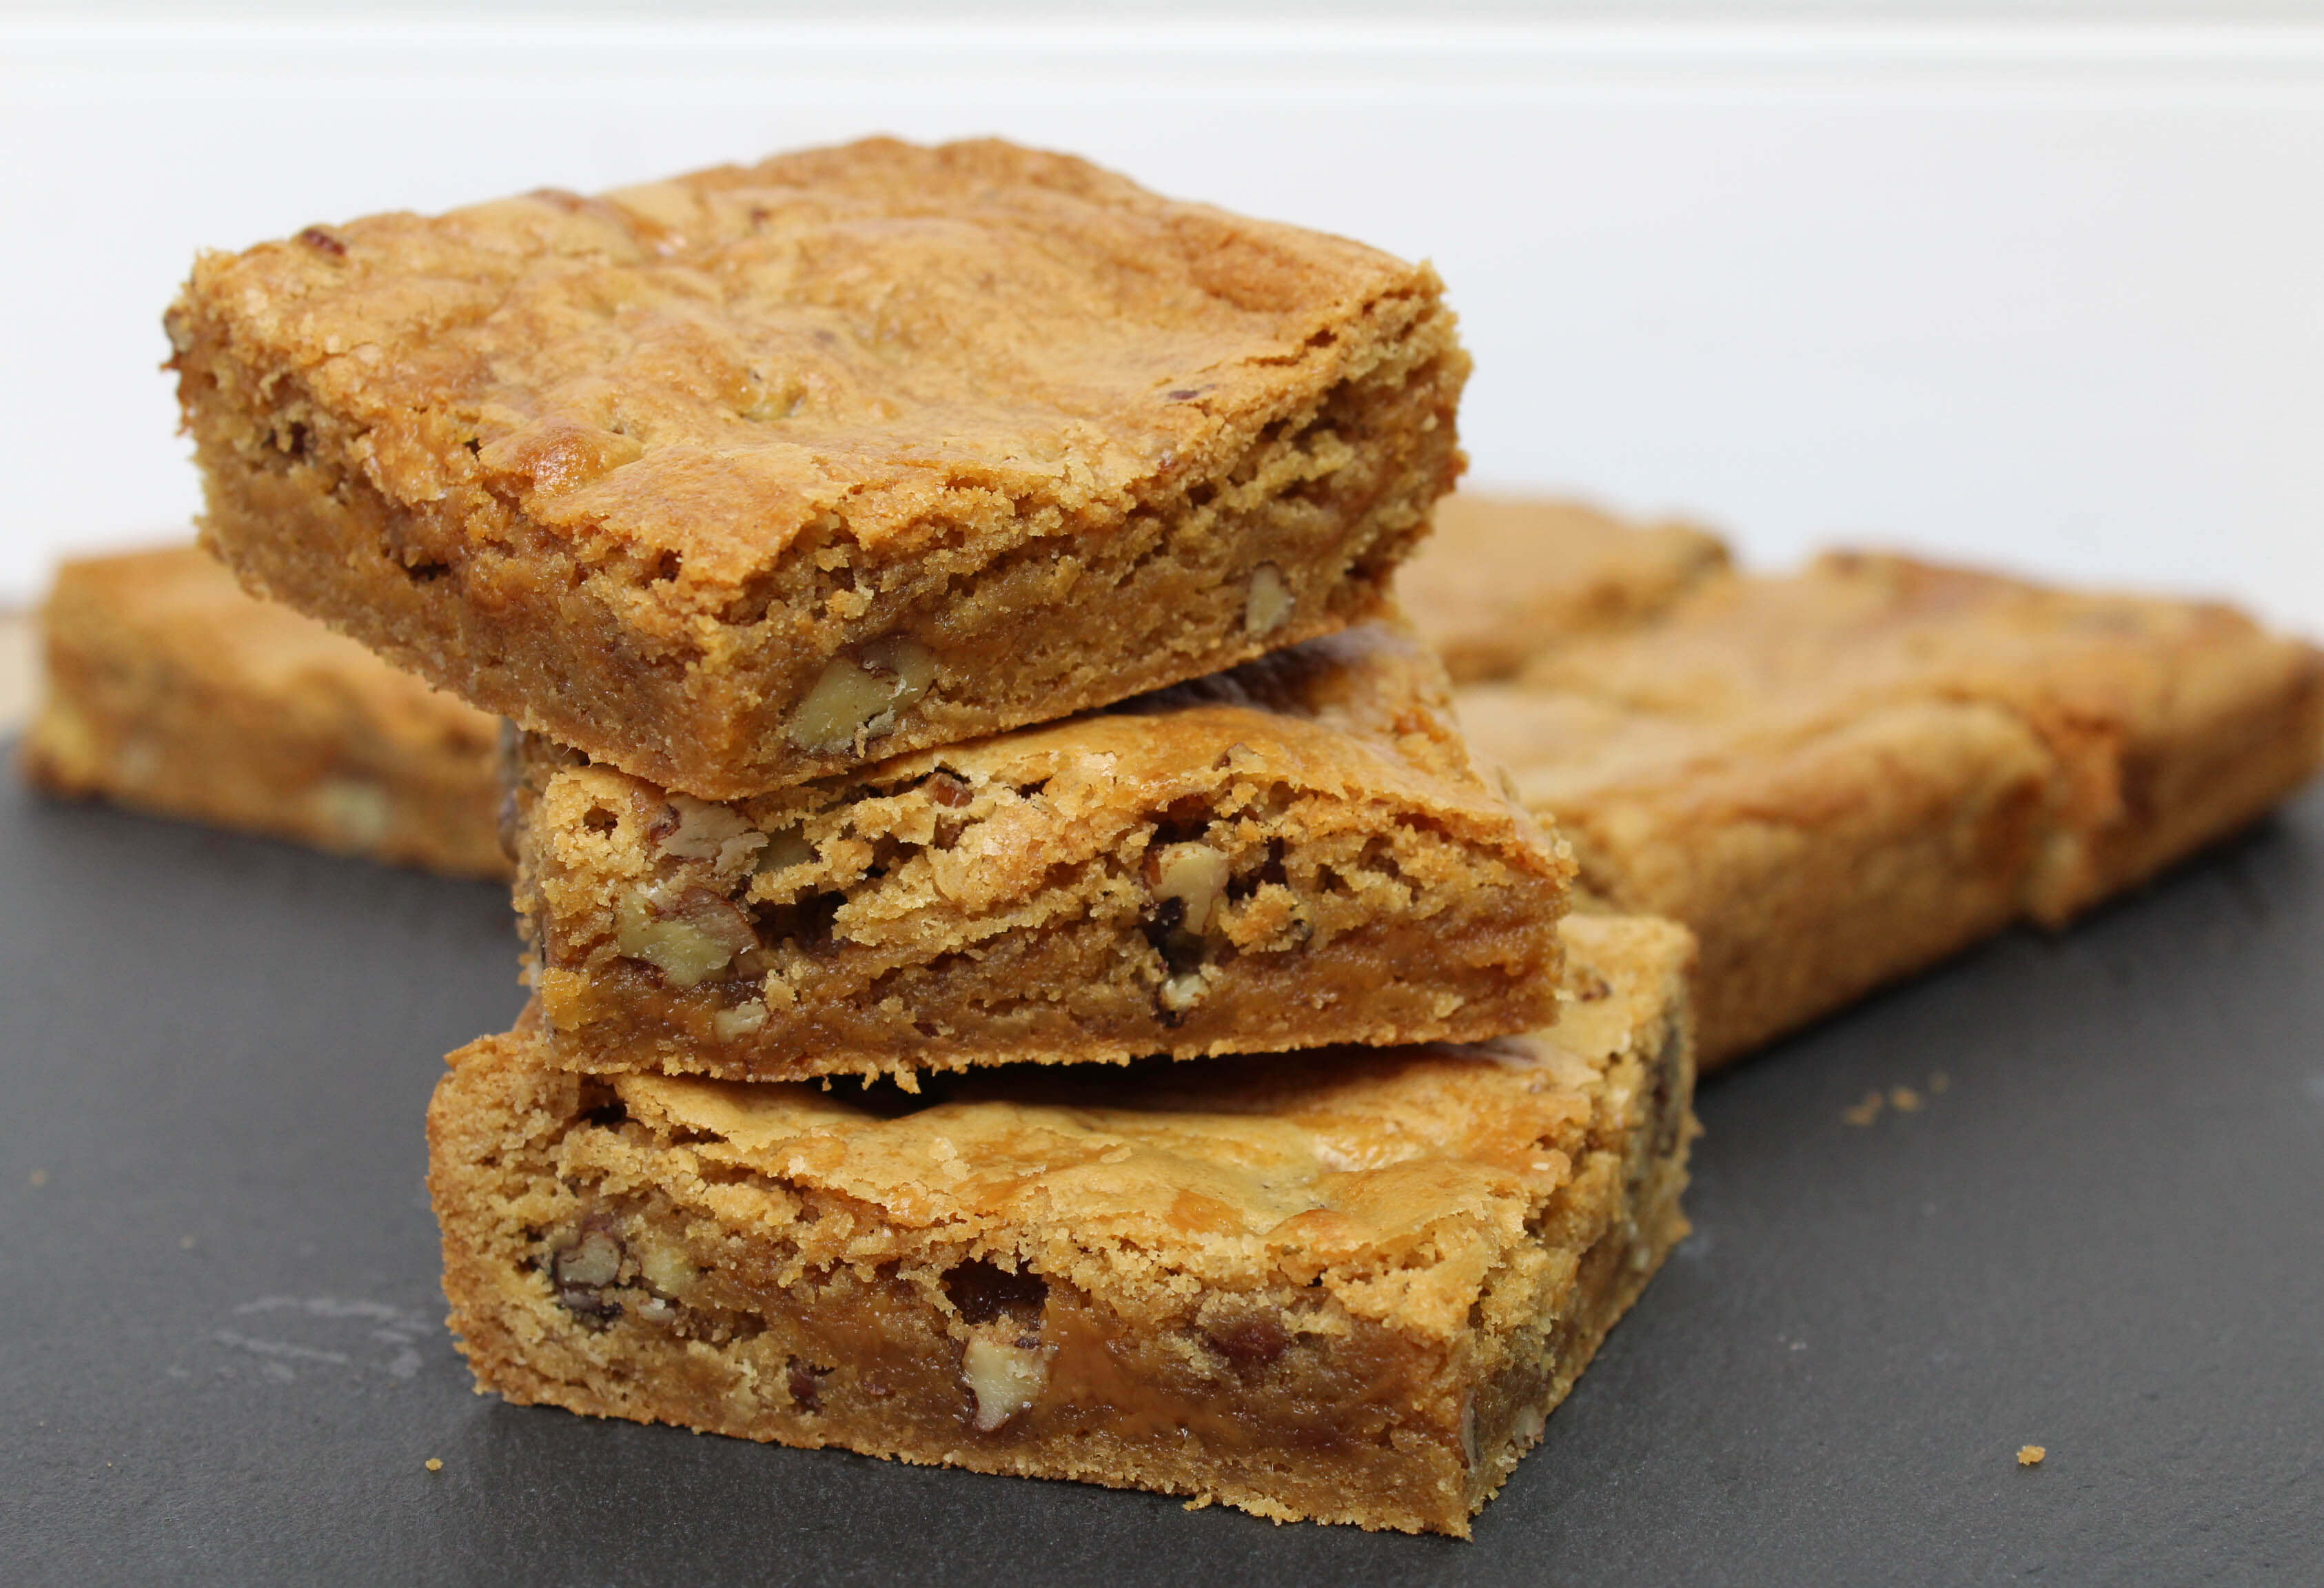
The sweetness of the caramel from the brown sugar, set against a lovely salted caramel with the crunch of pecans is tough to beat. I tested it on my guinea pigs, sorry my work colleagues and they were a resounding success. They can be a tough crowed to please.

These are amazingly simple to make and will be demolished in seconds.

Makes: 18 blondies
Oven Temp: Gas 4, 350F, 180C (160C Fan)

Ingredients:
100g melted butter
60ml rapeseed oil
250g light brown sugar
1.5 teaspoons vanilla extract
1 egg + 1 egg yolk
200g sifted plain flour
1/4 tsp baking powder
100g chopped pecan nuts
175g salted caramel sauce

Instructions:

  1. Pre-heat oven to 180c (160c) fan and line a square 9 inch baking tin with baking parchment.
  2. Melt the butter gently in a saucepan along with the oil.
  3. Once melted, whisk in the soft brown sugar and vanilla together until combined. Allow to cool for 5 minutes and pour into a mixing bowl.
  4. Whisk in the egg and additional egg yolk.
  5. Add the flour and baking powder to the wet ingredients and fold in gently until combined.
  6. Gently fold in the chopped pecan nuts.
  7. Press half of the batter into your tin.
  8. Drizzle the salted caramel all over the base and spread in an even layer.
  9. Blob the remaining batter over the caramel sauce and gently spread to cover the caramel evenly.
  10. Bake for 20-25 minutes until golden on top but still a little squidgy in the middle.
  11. Leave to cool in the tin for 30 minutes then remove and cut into 9 squares. Then divide the square in half to make 18 triangles.

Salted Caramel and Pecan Blondies
 
Save Print
Prep time
20 mins
Cook time
20 mins
Total time
40 mins
 
Delicious sweet , salty , nutty blondies
Author: CluckMuckCook
Serves: 18
Ingredients
  • 100g melted butter
  • 60ml rapeseed oil
  • 250g light brown sugar
  • 1.5 teaspoons vanilla extract
  • 1 egg + 1 egg yolk
  • 200g sifted plain flour
  • ¼ tsp baking powder
  • 100g chopped pecan nuts
  • 175g salted caramel sauce
Instructions
  1. Pre-heat oven to 180c (160c) fan and line a square 9 inch baking tin with baking parchment.
  2. Melt the butter gently in a saucepan along with the oil.
  3. Once melted, whisk in the soft brown sugar and vanilla together until combined. Allow to cool for 5 minutes and pour into a mixing bowl.
  4. Whisk in the egg and additional egg yolk.
  5. Add the flour and baking powder to the wet ingredients and fold in gently until combined.
  6. Gently fold in the chopped pecan nuts.
  7. Press half of the batter into your tin.
  8. Drizzle the salted caramel all over the base and spread in an even layer.
  9. Blob the remaining batter over the caramel sauce and gently spread to cover the caramel evenly.
  10. Bake for 20-25 minutes until golden on top but still a little squidgy in the middle.
  11. Leave to cool in the tin for 30 minutes then remove and cut into 9 squares. Then divide the square in half to make 18 triangles.
Notes
Makes: 18 blondies
Oven Temp: Gas 4, 350F, 180C (160C Fan)
3.5.3226


CHELSEA BUNS

11 July 12, 2017 Breads

Chelsea Buns

My inspiration to bake as a child was my dad. As my dad worked nights, we often baked together at weekends. I remember successes, failures, a lot of laughter and love. A passion that I am also passing on to my children who also love to join me in the kitchen is to make biscuits or cakes. My dad is also to blame for the families carb addiction. He could never walk past a bakery without popping in for a piece of bread pudding, Belgium bun or his favourite Chelsea bun.

CHELSEA BUNS

I have been wanting to make Chelsea buns for a long time. However I never seemed to have the time and if honest I have never been that confident in bread making or yeasted doughs, so have often put off making them.  I think this stems back to the first loaf I remember my dad and I making. It was so hard that archaeologists will find it in the back garden of our old house in a 100 years time and wonder why anyone would make a house brick out of flour and yeast, it was that solid and dense.

My bread over the last 6 months has improved greatly, due to some good tips from some bread guru friends. The main eureka moment in my bread making was when I was told the phrase “wetter is better for bread dough”. Historically my doughs were always firm and dry, which really limits the rise and gives a dense loaf. I now no longer fear wet dough and with some decent kneading it becomes beautifully smooth and elastic.

CHELSEA BUNS

So it was time to jump into the Chelsea buns. Those who know me know that I see candied peel as the devils food, so my fruit of choice was an even mix of sultanas, dried cranberries and sour cherries.

CHELSEA BUNS

These were a lot easier than I thought they would be to make and were absolutely delicious, I baked them on a Sunday so, when my parents popped in for a cup of tea, they could sample a lovely warm, sweet, fluffy, cinnamon and fruit filled bun. They went down a treat. They will now be a regular in my repertoire and a great base to tweak flavours with different fruits and spices.

Makes: 9
Oven Temp: Gas 5, 375F, 190C (170C Fan)

Ingredients:
500g strong white bread flour (plus some for dusting)
300ml full fat milk
40g softened butter (unsalted)
10g instant yeast
10g salt
1 egg (medium)

Filing:
25g melted butter (unsalted)
75g soft brown sugar
2 teaspoons ground cinnamon
210g dried fruit ( I used 70g sultanas, 70g dried cranberries, 70g dried cherries)

To Glaze:
2 tablespoons maple syrup

Icing:
100g Icing sugar
1-2 tablespoons maple syrup

Instructions:
1. Warm milk and butter in a small saucepan until the butter melts. Allow to cool to room temperature and beat in the egg.
2. Sift flour into a large bowl or the bowl of a stand mixer with the dough hook attached.
3. Add the yeast to one side of the bowl. Add the salt to the other side of the bowl. This helps stop the yeast being retarded by the salt.
4. Make a well in the centre and add the milk, butter and egg mixture.
5. Knead for 10 minutes by hand or 7 minutes in a stand mixer with a dough hook until the dough is smooth and elastic.
6. Transfer the dough to a large oiled bowl and cover with Clingfilm. Allow to proof until double in size (1-2 hours).
7. Line a deep sided roasting tin with baking parchment.
8. Gently tip the dough on to a lightly dusted work surface. Gently roll into a large rectangle about 5mm thick.
9. On the edge closest to you, squash the very edge of the dough all the way along so it sticks to the work-surface. This will help with rolling later.
10. Melt the butter and brush evenly over the dough.
11. Mix the brown sugar and cinnamon together and sprinkle all over the dough.
12. Spread the fruit evenly over the dough.
13. From the edge that is furthest away from you, tightly roll the dough , slightly pulling it away from you to keep tension against the edge that is stuck to the work surface.
14. Trim the ends so that you have a neat cylinder. Then cut into 9 equal slices.
15. Place the slices into the tin, leaving a little room for them to prove for a second time. Cover the tin with lightly oiled cling film and leave to prove for 30-60 minutes until double in size. Preheat the oven to 190c/170c Fan.
16. Bake for 20-25 minutes until risen and golden brown. Remove from the oven and brush over the maple syrup whilst the buns are still warm.
17. Move the buns to a wire rack to cool. Once cool, mix the icing sugar and maple syrup to a thick pouring consistency and drizzle over the cooled buns.

5.0 from 1 reviews
Chelsea Buns
 
Save Print
Prep time
3 hours
Cook time
20 mins
Total time
3 hours 20 mins
 
Delicious and lovely warm, sweet, fluffy, cinnamon and fruit filled Chelsea buns
Author: CluckMuckCook
Serves: 9
Ingredients
  • 500g strong white bread flour (plus some for dusting)
  • 300ml full fat milk
  • 40g softened butter (unsalted)
  • 10g instant yeast
  • 10g salt
  • 1 egg (medium)
  • Filing:
  • 25g melted butter (unsalted)
  • 75g soft brown sugar
  • 2 teaspoons ground cinnamon
  • 210g dried fruit ( I used 70g sultanas, 70g dried cranberries, 70g dried cherries)
  • To Glaze:
  • 2 tablespoons maple syrup
  • Icing:
  • 100g Icing sugar
  • 1-2 tablespoons maple syrup
Instructions
  1. Warm milk and butter in a small saucepan until the butter melts. Allow to cool to room temperature and beat in the egg.
  2. Sift flour into a large bowl or the bowl of a stand mixer with the dough hook attached.
  3. Add the yeast to one side of the bowl. Add the salt to the other side of the bowl. This helps stop the yeast being retarded by the salt.
  4. Make a well in the centre and add the milk, butter and egg mixture.
  5. Knead for 10 minutes by hand or 7 minutes in a stand mixer with a dough hook until the dough is smooth and elastic.
  6. Transfer the dough to a large oiled bowl and cover with Clingfilm. Allow to proof until double in size (1-2 hours).
  7. Line a deep sided roasting tin with baking parchment.
  8. Gently tip the dough on to a lightly dusted work surface. Gently roll into a large rectangle about 5mm thick.
  9. On the edge closest to you, squash the very edge of the dough all the way along so it sticks to the work-surface. This will help with rolling later.
  10. Melt the butter and brush evenly over the dough.
  11. Mix the brown sugar and cinnamon together and sprinkle all over the dough.
  12. Spread the fruit evenly over the dough.
  13. From the edge that is furthest away from you, tightly roll the dough , slightly pulling it away from you to keep tension against the edge that is stuck to the work surface.
  14. Trim the ends so that you have a neat cylinder. Then cut into 9 equal slices.
  15. Place the slices into the tin, leaving a little room for them to prove for a second time. Cover the tin with lightly oiled cling film and leave to prove for 30-60 minutes until double in size. Preheat the oven to 190c/170c Fan.
  16. Bake for 20-25 minutes until risen and golden brown. Remove from the oven and brush over the maple syrup whilst the buns are still warm.
  17. Move the buns to a wire rack to cool. Once cool, mix the icing sugar and maple syrup to a thick pouring consistency and drizzle over the cooled buns.
Notes
Makes: 9
Oven Temp: Gas 5, 375F, 190C (170C Fan)
3.5.3226


Cornbread muffins

0 June 27, 2017 Bake with the kids

The Ultimate Cornbread Muffins.

The heatwave has me in the BBQ spirit and the 4th of July / Independence day is just around the corner. One thing that the boys and I miss from our vacation in Florida last year are the sweet and fluffy cornbread muffins that seemed to accompany any BBQ meal in most restaurants.

So I thought I would try and recreate the ultimate delicious little fluffy bundles of joy. My benchmark for success is if my youngest son Ethan gives them the thumbs up.

Cornbread muffins

Whilst I do like to add additional flavours to breads and rolls, this base recipe is delicious on its own. Or it can be tweaked with a handful of diced jalapeños and a good grating of your favourite cheese.

The mix is perfect for a dozen muffin sized cornbreads, they are foolproof and super easy to make.

Cornbread

I have tried a few different recipes but the kids voted these the most awesome of the lot. Slathered in some nice cold slightly salted butter, you cannot go wrong. I got a double thumbs up from Ethan.


Makes: 12

Oven Temp: Gas 5, 375F, 190C (170C Fan)

Ingredients:

250g plain flour

130g cornmeal/polenta

270g caster sugar

1 1/2 teaspoon salt

1 tablespoon baking powder

120ml vegetable oil

2 large eggs

240ml full fat milk


Instructions:

1. Add flour, cornmeal, sugar, salt and baking powder to a large mixing bowl and mix together.

2. In a separate bowl mix the vegetable oil, eggs and milk.

3. Pour the wet ingredients into the dry ingredients and mix until combined and there are no lumps.

4. Grease a muffin pan and pour the batter into each section until about two thirds full.

5. Bake in a preheated oven at 170c Fan for 18-20 minutes until golden brown.

6. Allow to cool in the pan for a couple of minutes, then remove from the pan and allow to cool on a wire rack.


The ultimate cornbread muffins.
 
Save Print
Makes: 12 Oven Temp: Gas 5, 375F, 190C (170C Fan)
Author: CluckMuckCook
Ingredients
  • 250g plain flour
  • 130g cornmeal/polenta
  • 270g caster sugar
  • 1½ teaspoon salt
  • 1 tablespoon baking powder
  • 120ml vegetable oil
  • 2 large eggs
  • 240ml full fat milk
Instructions
  1. Add flour, cornmeal, sugar, salt and baking powder to a large mixing bowl and mix together.
  2. In a separate bowl mix the vegetable oil, eggs and milk.
  3. Pour the wet ingredients into the dry ingredients and mix until combined and there are no lumps.
  4. Grease a muffin pan and pour the batter into each section until about two thirds full.
  5. Bake in a preheated oven at 170c Fan for 18-20 minutes until golden brown.
  6. Allow to cool in the pan for a couple of minutes, then remove from the pan and allow to cool on a wire rack.
3.5.3226

Brioche

0 March 12, 2017 Breads

Brioche

Those who know me well know that bread making has been my nemesis. However over the past year I have given it a lot more focus and one of the guys I used to work with is a bit of a legend in bread making and with his sage advice “wetter is better”, my bread making has turned a corner.

Brioche

The extreme end of the “wetter is better” mantra is the Brioche dough. The dough coming out of the mixer is more like a batter than a dough but a night resting in the fridge, not only adds a depth of flavour but also firms up the dough so it can be shaped.

For this attempt and to stop family arguments I went for a plain version, based on a Paul Hollywood recipe (but added a little more sugar). My wife was rooting for a choc chip and orange, I like a little lemon zest in mine. My youngest son Ethan, who is the bread connoisseur, likes it straight up when warm or with a little butter when it is cooled. If he has not snaffled the lot when it is warm that is.

Brioche

Bread can be a commitment but working it in around what you are up to is fine. I made the dough before I went to bed with every intention to bake it mid morning. By the time I had gone out for a run with the eldest son, done some work up the allotment and walked the dog, it ended up an afternoon/teatime treat. The extra time in the fridge does it no harm.

This heavily enriched bread with 5 eggs and lots of butter is deliciously rich but also amazing light. It is like eating a fluffy, buttery cloud.

Brioche

Makes: 1 round tin loaf
Oven Temp: Gas 5, 375F, 190C (170C Fan)

Ingredients:

500g strong white bread flour
7g salt
65g caster sugar
10g instant yeast
140ml milk
5 medium eggs
250g softened unsalted butter

Instructions:

1. Put the flour into the bowl of a mixer. Add the salt and sugar to the bowl and then the yeast, keeping it away from where you put the salt.

2. Warm the milk in a pan or in the microwave so it is tepid. Whisk the eggs into the milk and add to the dry ingredients.

3. With the dough hook attached, mix on a slow for 2 minutes, then speed up to a medium speed for 6 – 8 minutes until you have a soft, elastic dough. It will still be very wet.

4. Cut the butter into tablespoon size chunks and add to the dough and mix for another 5 minutes. Half way through, scrape down the sides of the bowl right down to the bottom, to ensure that the flour and butter is thoroughly mixed in. The dough will still be very soft.

5. Tip the dough into a bowl, cover with clingfilm and put in the fridge overnight. The dough will firm up and you will be able to shape it.

3. Grease a 23cm-25cm round deep cake tin. A springform tin makes it easier to get out (I used a 23cm as that was the largest I had).

4. Take your brioche dough from the fridge. Tip it onto a floured surface and knock it back. Divide it into 12 equal pieces. Roll each piece into a ball. Put 10 of the balls around the edge of the tin and two in the middle.

5. Cover with the clean plastic bag and leave to prove for 2 – 3 hours, or until the dough has doubled in size.

6. Heat your oven to 190°C (170°C Fan)

7. When doubled in size, bake for 25 – 30 minutes or until a skewer inserted into the middle comes out clean. If it is getting too brown place some foil loosely over the top.

8. Remove the brioche from the tin and cool on a wire rack.


Adapted from a Paul Hollywood recipe

Rolo Cupcakes

0 February 19, 2017 Bake with the kids

Rolo Cupcakes

Thursday night before half term and the school tweets that there will be no after school clubs on the Friday. Normally not a major concern but Ollie was looking forward to the school bake off club and making his Rolo chocolate cupcakes. As we had already weighed out the ingredients for him to take in I promised I would make them with him at the weekend.

For an extra flourish we did add some vanilla butter icing, which complimented the chocolate cupcakes perfectly.

Rolo Cupcakes

I would caution though, after my last escapade with Rolos in chocolate brownies. I tried to turn the brownies out of the pan too early and ended up with the Rolos welding to one hand. I ended up doing a dance of pain, whilst trying to work out if I should save the brownie or save my hand . The brownie won and was saved and I spent the rest of the night with my hand in a bowl of iced water.

As we often bake together at the weekend, it spawned the idea of a section of the blog dedicated to baking with the kids. All the recipes in this section will be baked by Ollie, loosely under my supervision so that he does not set fire to the house or chop off a finger!

Hopefully these easy and delicious recipes will be used by mums and dads to get the kids baking.

Rolo Cupcakes
Makes: 12 Cupcakes
Oven Temp: Gas 4, 350F, 180C (160C Fan)

Ingredients:
100g butter, softened
175g light brown sugar
175g self raising flour
25g cocoa powder
2 eggs
125ml milk
12 Rolos
12 muffin cases

Butter cream icing:
140g butter, softened
280g icing sugar
1-2 tbsp milk
1 tsp Vanilla extract

Instructions for the cupcakes:

  1. Preheat the oven to 180C/160F Fan.
  2. Sift flour, cocoa powder and sugar in the mixing bowl.
  3. Add the wet ingredients: egg, milk and butter
  4. With a wooden spoon beat all the ingredients together until they form a smooth batter.
  5. Line a muffin tin with the cases and divide the mixture evenly between the 12 cases.
  6. Poke a Rolo into the batter until it is just covered.
  7. Bake in the oven for 15-20 minutes.
  8. Let cool for a couple of minutes in the muffin tin . Then transfer to a cooling rack.
  9. Do not eat when hot as the Rolos are like lava!

Instructions for the butter icing:

  1. If you have a mixer put the butter and sift half of the icing sugar into the mixer bowl and beat on a slow speed until smooth. Or you can do this with a wooden spoon.
  2. Sift the remaining icing sugar and one tablespoon of the milk and the vanilla and beat the mixture until creamy and smooth.
  3. Beat in the extra tablespoon of milk, if necessary, to loosen the mixture.
  4. Pipe or spoon onto the cooled cupcakes.
Canele

7 February 5, 2017 Cakes

Canele

Time for a coffee on a midweek afternoon at work. I need to stretch my legs as I have been hunched over my computer working on presentations most of the week. So rather than pop to the staff canteen, I decide on a stroll outside. Canary Wharf has a great selection of coffee shops and whilst Starbucks in Jubilee Place has a great friendly team and can knock out a consistently decent cappuccino, I fancied something a bit different.

Canele

On the lower level of Jubilee Place, tucked away under the escalators, there is a little ‘Paul’ French patisserie booth. Along with good coffee, they always have an interesting selection of breads, cakes and patisserie. I was browsing what they had whilst the coffee was being made and I spotted what looked like little burnt sandcastles. I had never seen them before but they looked intriguing. I made a note of their name ‘canelé’, grabbed my coffee and put them to the back of my mind until I got home.

Canele

After a little googling I found out that a canelé is a small French pastry, flavoured with rum and vanilla, with a soft custard centre and a dark, thick caramelised crust. It originates from the Bordeaux region of France.

When browsing some recipes two things became evident. Firstly you need a special baking pan to get the traditional shape. I always like an excuse to buy another fancy baking tray. Secondly the recipe is a cross between basically a wet pancake batter and a custard, which is hard to mess up. Do not be scared when you make these and the batter seems barely thicker than water.

Canele

You could probably make these in muffin pan or mini popover tin but you would have to play around with the cooking timing. The recipe I landed on was a Michel Roux Jr recipe but I switched out the rum for brandy.

Canele

They are very easy to make but the batter is best rested overnight in the fridge. These make delicious breakfast treats on a Sunday morning with a strong cup of coffee.

When baking you want to see the bottom turn a rick dark brown. Then the outside will be nice and caramelised when you turn them out. You start with a hot oven at 220c for 8 mins then turn down to 180c for the final 40 minutes.

Makes: 18
Oven Temp: Gas 4, 350F, 180C (160C Fan)

Ingredients:
500ml milk
2 eggs
2 egg yolks
100g plain white flour
200g caster sugar
50g butter
1 tbsp brandy
1 tsp vanilla extract
A pinch of salt

Instructions:

  1. Warm the milk in a saucepan and add the vanilla extract and butter. Allow the butter to melt and gently stir. Once the butter has melted take off the heat.
  2. In a large bowl, whisk together the eggs and sugar and sift in the flour and salt. Whisk to a smooth thick batter and add the brandy.
  3. Add the lukewarm milk and melted butter mix into the bowl. Whisk until you get a liquid batter mix without any lumps, like a thin pancake mixture.
  4. Allow to cool and leave to rest overnight in the fridge covered with cling film.
  5. Preheat your oven to 220c.
  6. Grease your pan/ moulds with melted butter.
  7. Remove the batter from the fridge, give it a quick whisk and fill the mounds almost to the top. Do not fill quite to the brim as they may to rise a little.
  8. Bake in the oven at a 220c for 8 minutes then lower the heat to 180c for a further 40 mins.
  9. Remove them from the oven when the tops are a rich dark brown and leave to cool down for at least 10 minutes before removing them from their moulds.

Canele
 
Save Print
Prep time
30 mins
Cook time
48 mins
Total time
1 hour 18 mins
 
Author: CluckMuckCook
Serves: 18
Ingredients
  • 500ml milk
  • 2 eggs
  • 2 egg yolks
  • 100g plain white flour
  • 200g caster sugar
  • 50g butter
  • 1 tbsp brandy
  • 1 tsp vanilla extract
  • A pinch of salt
Instructions
  1. Warm the milk in a saucepan and add the vanilla extract and butter. Allow the butter to melt and gently stir. Once the butter has melted take off the heat.
  2. In a large bowl, whisk together the eggs and sugar and sift in the flour and salt. Whisk to a smooth thick batter and add the brandy.
  3. Add the lukewarm milk and melted butter mix into the bowl. Whisk until you get a liquid batter mix without any lumps, like a thin pancake mixture.
  4. Allow to cool and leave to rest overnight in the fridge covered with cling film.
  5. Preheat your oven to 220c.
  6. Grease your pan/ moulds with melted butter.
  7. Remove the batter from the fridge, give it a quick whisk and fill the mounds almost to the top. Do not fill quite to the brim as they may to rise a little.
  8. Bake in the oven at a 220c for 8 minutes then lower the heat to 180c for a further 40 mins.
  9. Remove them from the oven when the tops are a rich dark brown and leave to cool down for at least 10 minutes before removing them from their moulds.
Notes
You start with a hot oven at 220c for 8 mins then turn down to 180c for the final 40 minutes.

Oven Temp: Gas 4, 350F, 180C (160C Fan)

Rest batter overnight for best results
3.5.3226


Blood Orange Upside Down Cake

98 January 22, 2017 Cakes

Blood Orange Upsidedown Cake

One great thing about being a baking social media geek is that it is very obvious when ingredients come into season in the Winter. The summer is a lot easier as I share an allotment with my father, so I tend to bake whatever is in harvest. However it is lovely to have something other than apples and pears to bake with, something with a fresh and vibrant colour and taste.

Blood Orange Upside Down Cake

This time of year one of my favourite ingredients comes back into season, blood oranges. If you have been looking at Pinterest recently, lots of recipes have been popping up. I had been planning an upside down cake for a while and have also been playing around with different sponge recipes.

I spotted some blood oranges in the local farm shop when we popped into their Cafe for a birthday breakfast treat for my wife.

Blood Orange

So this weekend was a perfect time to bring it all together. A fat free almond and orange cake, made moist with two oranges that have been simmered for a couple of hours to remove any bitterness and then blitzed to a pulp and mixed into the egg, sugar and almond mixture.

I carefully thinly slice 3 blood oranges on a mandolin and simmer them in the juice of an orange and sugar .

The remaining syrup I had planned to reduce down to glaze the top. Unfortunately I got side tracked and burnt it to a cinder and spent the next hour with all the windows and doors open, clearing the acrid smoke from the house and praying that no one called the fire brigade. Once I could see further than my nose in the kitchen, I ventured back in and knocked up another pan of orange syrup.
You could sneak a glug of Grand Marnier or Cointreau into the syrup to give it an extra kick on these cold winter days.

I scrunched up the baking parchment to line the tin’s bottom and up the sides, then laid in the slices starting at the centre and working my way outwards, finishing slightly up the sides.

Blood Orange Upside Down Cake

Once cooked and after dinner, I was dispatched to the garage to pick up some double cream to have with it. It is still the wife’s birthday weekend after all, I can be good on Monday.

175C/325F/Gas 3  – Serves 12

Sponge
2 large oranges
6 free-range eggs
250g/9oz ground almonds
250g/9oz caster sugar
1 tbsp baking powder

Toping
2-3 blood oranges
1 cup caster sugar
1/2 cup water

Instructions

  1. Rinse 2 oranges in hot water. Then add them to a large pan of simmering water and simmer gently for 2 hours.
  2. Leave the oranges to cool, chop up and remove any pips. Then put in a food processor or blender and whizz to a pulp.
  3. Slice 3 blood oranges thinly on a mandolin or with a sharpie knife.
  4. In a pan, add the water and caster sugar and bring to a simmer, stirring to dissolve the sugar.
  5. Add the orange slices and simmer for about 15 minutes until the rinds become slightly translucent.
  6. Once cooked, remove the slices with a slotted spoon and allow to cool so you can handle them.
  7. Grease and line a 9 inch tin with baking parchment.
  8. Place the slices slightly overlapping all over the bottom of the tin, working outwards and slightly up the side to finish. Brush with a little of the syrup.
  9. Preheat the oven to 175C/155c fan.
  10. Beat the eggs and sugar together until they are light and fluffy and have reached the ribbon stage.
  11. Mix in all the remaining ingredients, including the orange pulp.
  12. Pour into the cake tin and cook for about an hour, until the cake is golden in colour and a a skewer comes out clean when inserted n the middle.
  13. Transfer to a wire cooling rack, keeping the cake in the tin. When the cake has cooled, carefully remove from the tin and gently peel off the baking parchment.
  14. Brush the top with any remaining syrup to glaze.
Shortbread Cookies

3 January 14, 2017 Bake with the kids

Ollie’s Shortbread Biscuits

Saturday morning, the last remnants of snow are still lingering in the garden and my eldest son has decided he wants to make some shortbread biscuits all on his own. What a great start to the weekend, we all love shortbread biscuits, especially the dog. A nice big mug of coffee and a warm biscuit sound good to me. It also makes me nostalgic of when I used to bake with my dad as a kid so I was up for a quick bit of baking.

Shortbread Cookies

Shortbread biscuits are very easy to make so perfect for the kids to get stuck into.

I took on my standard role of “commis chef”, more commonly known as gofer and washer upper. My son pulled out his usual go to shortbread recipe and decided to add some vanilla essence. Good call in my opinion.

Shortbread Cookies

After directing me to get everything he needed out of the cupboards, he set about making the biscuits (and of course a mess). Anything on the floor becomes the dog’s job to clean up. Which he does with relish.

We had also recently bought a cookie letter stamp set, so we thought it a good idea to brand his biscuits with his name as a final flourish.

Shortbread Cookies

Once the cookies had been cut and stamped and left in the fridge to firm up my son disappeared, more stealthy than a ninja, back to the Xbox and to leave me to clear up the aftermath. That’s my boy, I used to do that to my dad but back in the day it would have been a Gameboy.

Once baked, the “Hillery” baking judges, Ethan (7), Ann my wife, Chester the Cockerpoo and Oliver all dug in. The verdict must have been good, as by the time I had made a cup of coffee they were nearly gone. Oh well, maybe next weekend I will get a look in.
Makes: 8 (7 cm) cookies
Oven Temp: Gas 5, 375F, 190C (170C Fan)

Ingredients
125g butter (room temperature)
55g caster sugar, plus extra to finish
180g plain flour
1/2 teaspoon vanilla extract

Instructions

  1. Preheat the oven to 190C (170C Fan)
  2. Beat the butter, sugar and vanilla essence together with a wooden spoon until smooth.
  3. Stir in the flour and mix together to bring all the ingredients together. Try not to overwork. Turn on to a lightly floured work surface and gently roll out to about 1 cm thick.
  4. Cut out with a cookie cutter and place onto a baking tray. Roll together any spare dough and repeat.
  5. Sprinkle with caster sugar and place in the fridge for 20-30 minutes to chill the dough. This will help prevent spreading.
  6. Bake in the oven for 15-20 minutes until pale golden-brown.
  7. Let cool for a couple of minutes on the baking tray. Then transfer to a cooling rack to finish cooling.

Ollie's Shortbread Biscuits
 
Save Print
Prep time
15 mins
Cook time
20 mins
Total time
35 mins
 
Delicious rich buttery shortbread biscuits
Author: CluckMuckCook
Serves: 8
Ingredients
  • Ingredients
  • 125g butter (room temperature)
  • 55g caster sugar, plus extra to finish
  • 180g plain flour
  • ½ teaspoon vanilla extract
Instructions
  1. Instructions
  2. Preheat the oven to 190C (170C Fan)
  3. Beat the butter, sugar and vanilla essence together with a wooden spoon until smooth.
  4. Stir in the flour and mix together to bring all the ingredients together. Try not to overwork. Turn on to a lightly floured work surface and gently roll out to about 1 cm thick.
  5. Cut out with a cookie cutter and place onto a baking tray. Roll together any spare dough and repeat.
  6. Sprinkle with caster sugar and place in the fridge for 20-30 minutes to chill the dough. This will help prevent spreading.
  7. Bake in the oven for 15-20 minutes until pale golden-brown.
  8. Let cool for a couple of minutes on the baking tray. Then transfer to a cooling rack to finish cooling.
Notes
Makes: 8 (7 cm) cookies
Oven Temp: Gas 5, 375F, 190C (170C Fan)
3.5.3226


Croissants

1 January 3, 2017 Pastry and Pies

Classic Croissants

Before we start, are you sitting comfortably? Like the actual process of croissant making, this post will be long and require some commitment. This recipe is made over three days which sounds a long time but with some good planning, if you start on Friday evening, you will have some perfect flaky croissants ready for Sunday brunch.

Croissants

I love croissants, a love from many a schoolboy holiday in the south of France with my family. Freshly baked and either slathered in butter and jam or dipped in a cafe au lait, you cannot go wrong. A skinny flat white supermarket croissant does not quite hit the mark and are a poor relation to a freshly cooked traditional croissant.

As I had a few days off work, I thought it was the perfect time to try making my own. I must admit my first attempt were an epic fail. Using a different recipe to the one listed below, I tried to rush through the steps to my own peril and ended up with a soggy, buttery roll.

So on the second attempt, using a recipe I found from the weekend bakery site which I tweaked slightly, lowering the amount of butter to be laminated in the dough produced some great results. On my internet search I found a tip that if you are a croissant newbie like me, reducing the butter makes the lamination process easier. As you build your skills you can up the butter content.

Fortify yourself with some strong coffee, practice a few gaelic shrugs, adopt a laissez faire approach  and as they say on the Great British Bake Off…..BAKE.

Ingredients for the dough

500g plain flour (extra for dusting)
140g water
140g milk
55g sugar
40g softened unsalted butter
11g instant yeast
12g salt

Other Ingredients
250g butter, unsalted (chilled) for laminating
1 egg to wash

Makes 15 Croissants
Oven Temp: Gas 6, 400F, 200C (180C Fan)

Instructions

Day 1. Make the dough

  1. Combine all of the dough ingredients in a bowl and knead for 3 minutes until the dough comes together. You do not have to knead for as long as you would do for bread. At this stage you are not looking to build up too much gluten as this will make the lamination stage harder. Just a nice soft pliable dough.
  2. Flatten the dough into a disc about the size of a dinner plate. Wrap in clingfilm and put in the fridge overnight.


Day 2. Lamination day

Now this next stage requires some precision and patience.

  1. Draw a square 15 cm x 15 cm on a piece of baking parchment. Then draw another square 17 cm x 17 cm around the outside with an equal gap on each edge (see photo).
  2. Cut the butter lengthways in approximately 1 cm thick slabs. Arrange the pieces of butter to fill the 15 cm x 15 cm square.Croissants
  3. Cover the butter with another layer of waxed paper and with a rolling pin pound butter until it all forms one sheet and spreads beyond the 17 cm x 17 cm square.
  4. Trim the edges of the butter back to the 17 cm x 17 cm square, put the trimmings on top of the square.
  5. Now pound gently to incorporate the trimming, ending with a final neat square of 17 cm x 17 cm.Croissants
  6. Wrap in the baking parchment and put in the fridge until needed.
  7. Take the dough out of the fridge.
  8. Roll out the dough disc into a 26 cm x 26 cm square.
  9. Like the precision on the butter square try to get the square as perfect as possible.
  10. Remove the square of butter from the fridge.
  11. Place the dough square so one of the sides of the square is facing you and place the butter on top at a 45 degree angle to the dough (see picture).
  12. Fold each flap of dough over the butter, so the point of the flaps reaches the centre. The edges of the dough flaps should slightly overlap to fully enclose the butter.
  13. Press the seams to seal in the butter.Croissants
  14. On a lightly floured surface, roll out the the dough to a rectangle of 20 x 60 cm.
  15. Fold the dough like a letter in thirds, fold one third up and the other third on top of that. Then cover with clingfilm and put in the fridge for 30 minutes. This is 1 “turn”.
  16. Repeat the rolling and folding two more times, each time rolling the dough to 20 cm x 60 cm. After each “turn” turn the dough 90 degrees before rolling again. The open ‘end’ of the dough should be towards you every time when you start to roll.
  17. After the third “turn” put the dough in the fridge overnight until day 3.

Day 3- Time to eat…almost.

  1. Take the dough out of the fridge.
  2. Lightly flour your work surface and roll the dough into a long strip of 20 cm wide and just over 100 cm long.
  3. Make a little paper triangle croissants template, save the faff of measuring each croissant. The base of the triangle should be 12.5cm wide and 20cm tall. With both sloping side equal length.
  4. Cut out your croissant shapes working from left to right. A pizza wheel is ideal for this.
  5. Cut a notch about 1cm in the middle of the base of the triangle and stretch the base a little so it looks like the Eiffel tower (or Wigwam).Croissants
  6. Roll from the base rolling tightly and firmly but without squashing the croissant.Place on a baking tray lined with baking parchment. At this stage you could freeze them. When frozen put them in a ziplock bag and defrost overnight on a lined baking tray covered with oiled cling film)
  7. Egg wash the croissants and allow to rise for a couple of hours, until doubled in size.Croissants
  8. Preheat oven to 200c/180c fan . Bake for 18-20 minutes.


Christmas Cake

135 December 24, 2016 Cakes

Quick Christmas Cake

It is Christmas Eve and late last night my wife mentioned that we are taking a cake to my sister-in-law’s on Christmas Day. Time for a small panic! Luckily I have a few jars of homemade mincemeat left and a quick rummage through the baking cupboard unveils half a bag of brandy soaked dried fruit and Christmas spices. I have based the recipe on a Mary Berry mincemeat cake recipe.

Whilst I normally like my Christmas cake to mature and get a sound drenching in brandy, this is a quick and delicious cake that will do the job perfectly. I am a pecan addict though and have swapped out almonds for them as well as adding some mixed spice.

This is a super quick recipe to prepare, I cream the softened butter and sugar together first. Then throw everything else into the stand mixer and mix until blended all together. No fuss. Into a lined 2lb loaf tin, pop it into a low oven for about 90 minutes and you are done.

Christmas Cake

This with a cup of tea will go down a treat after a nice afternoon dog walk through the village.

I love a bit of marzipan and icing on my Christmas cakes but you could decorate with nuts and glaze it with some warmed apricot jam.

Ingredients
150g soft butter
150g dark muscovado sugar
2 large eggs
225g self-raising flour
1 heaped teaspoon mixed spice
225g mincemeat
200g mixed dried fruit (soaked in brandy)
50g pecans chopped

Optional:
Marzipan and fondant icing or nuts to decorate
1 tablespoon apricot jam to glaze

Instructions

Makes 1 large loaf cake

1. Preheat the oven to 180c / 160C fan 140C/gas 3. Line a 2lb loaf tin
2. Cream the softened butter and sugar together either with a wooden spoon in a large bowl or a stand mixer.
3. Add all the remaining ingredient into the bowl and beat well until thoroughly blended.
4. Spoon into the lined loaf tin and level out.
5. Bake in the preheated oven for about 1 1/4 – 1 1/2 hours until the cake is golden brown and a skewer comes out clean when poked into the middle of the cake.
6. Allow the cake to cool in the tin for a few minutes, turn out on to a wire rack and leave to cool.
7. To decorate, warm the apricot jam in a small saucepan and brush over the top of the cake.
8. Roll out the marzipan and icing and cut to just cover the top of the cake. Use the tin you baked it in as a guide. Place on top of the cake.

5.0 from 1 reviews
Quick Christmas Cake
 
Save Print
Prep time
15 mins
Cook time
75 mins
Total time
1 hour 30 mins
 
A delicious quick Christmas fruitcake packed with mincemeat and dried fruits .
Author: CluckMuckCook
Serves: 1
Ingredients
  • 150g soft butter
  • 150g dark muscovado sugar
  • 2 large eggs
  • 225g self-raising flour
  • 1 heaped teaspoon mixed spice
  • 225g mincemeat
  • 200g mixed dried fruit (soaked in brandy)
  • 50g pecans chopped
  • Optional:
  • Marzipan and fondant icing or nuts to decorate
  • 1 tablespoon apricot jam to glaze
Instructions
  1. Makes 1 large loaf cake
  2. Preheat the oven to 180c / 160C fan 140C/gas 3. Line a 2lb loaf tin with baking parchment.
  3. Cream the softened butter and sugar together either with a wooden spoon in a large bowl or a stand mixer.
  4. Add all the remaining ingredient into the bowl and beat well until thoroughly blended.
  5. Spoon into the lined loaf tin and level out.
  6. Bake in the preheated oven for about 1¼ - 1½ hours until the cake is golden brown and a skewer comes out clean when poked into the middle of the cake.
  7. Allow the cake to cool in the tin for a few minutes, turn out on to a wire rack and leave to cool.
  8. To decorate, warm the apricot jam in a small saucepan and brush over the top of the cake.
  9. Roll out the marzipan and icing and cut to just cover the top of the cake. Use the tin you baked it in as a guide. Place on top of the cake.
3.5.3226


  • « Go to Previous Page
  • Go to page 1
  • Go to page 2
  • Go to page 3
  • Go to page 4
  • Go to page 5
  • Interim pages omitted …
  • Go to page 7
  • Go to Next Page »

Copyright© 2025 · Cookd Pro Theme by Shay Bocks